Jump to:
No content available.
Welcome!
This manual helps you to use the administration portal in the optimum way. Please use this manual during operation.
We wish you success and joy in working with the administration portal and this manual!
Subject to alterations
Version 1 / 02.2016 (en)
How does the telephone system work?
Our telephone system is a new, highly innovative type of telephone system connected to a conventional telephone network. What is new is that instead of an ISDN connection, you can now access the telephone system directly via the Internet. This eliminates the need to install a telephone system on site. Synonyms for this on the market are also virtual telephone system or hosted PBX – Private Branch Exchange or IP Centrex. With the help of this technology, even small companies have access to the functions of a sophisticated telephone system as can be typically found in large companies. The extensive scope of services of our system includes functions such as voicemail, queues, voice dialogues and telephone conferences. The system telephones communicate with the telephone system via the company’s local network and the broadband data circuit (ADSL or SHDSL).IP telephones digitise telephone calls to ISDN quality and transmit them to the data centre via the company network and broadband data circuit, where they are then transmitted to the public telephone network. Internal calls are of course transmitted to the respective end device directly within the company network. The system is configured via the service site, which can be easily accessed on the web. Furthermore, some functions (e.g. call forwarding and logging into queues) can also be set up using the telephones.
No content available.
The new administration portal provides the user with a simple and intuitive configuration of key elements of his/her virtual telephone system. The user can quickly add or manage a new element.
Using the administration portal, you can add a service or an extension in just one step. Add a new service (for example a queue) and determine directly when configuring the service, whether to assign an extension or only a specific direct dial number.
Further information regarding the Telephone extensions can be found under "C. 3.1.1 Phone extension".
What do the menu items TARGETS, ELEMENTS, ADMINISTRATION and DID on the service site have to offer?
The service site distinguishes between various categories of system components and at the same time, combines associated components by theme in each category.
| Classes | Description |
| TARGETS | All components of the telephone system, which forms a point for calls, are administrated under targets. This includes:
|
| ELEMENTS | The category elements covers all basic modules of the telephone system, i.e. the telephones themselves as well as audio files to use as hold music, hold music for queues and announcements. You need the elements as basic modules for the configuration of services and terminal points. |
| ADMINISTRATION | Management of:
|
| DID | DID provides a quick overview of the telephone numbers configured for your system, the associated direct dial numbers and all existing extensions. Here, you can also change the assignment of telephone numbers for outside lines and link direct dial numbers with extensions or services. |
In order to understand the system and its configuration, it is essential to understand that the extension is the basis of the telephone system. A number is not assigned to a person or a telephone but to the extension. In turn, this extension can be assigned to a destination. Possible destinations are:
- Telephones (or a fax machine)
- An eFax
- Services (such as queues)
An extension is always the internal number, i.e. this number is used to reach parties and also services within the company without dialling the outside line prefix (leading “0”). This internal number is always completely independent of the direct dial number dialled from outside. That is, extensions cannot be valid at all from outside or in theory, with a different number sequence. In the case of telephones, it is usually typical for the internal telephone number (extension) to also correspond to the external telephone number (direct dial number).
Quick relocation…
A user’s personal settings are assigned to the respective extension (not to the telephone!). This enables being able to “relocate” the properties of an extension to another telephone without having to reprogram the settings. Consequently, the extension is virtually the “soul” of a telephone.
This function is also referred to as “hot-desking”. For example, you work from several locations and always use the same extension.
Example:
From Monday to Wednesday you work at site A and Thursday to Friday you work at site B. You can easily use the same extension by selecting the respective end device for the location on the service site, when configuring your extension.
No content available.
The telephone system is configured via the service site.Open an Internet browser and enter the the following address (URL): https://portal.voip-centrex.dfn.de/
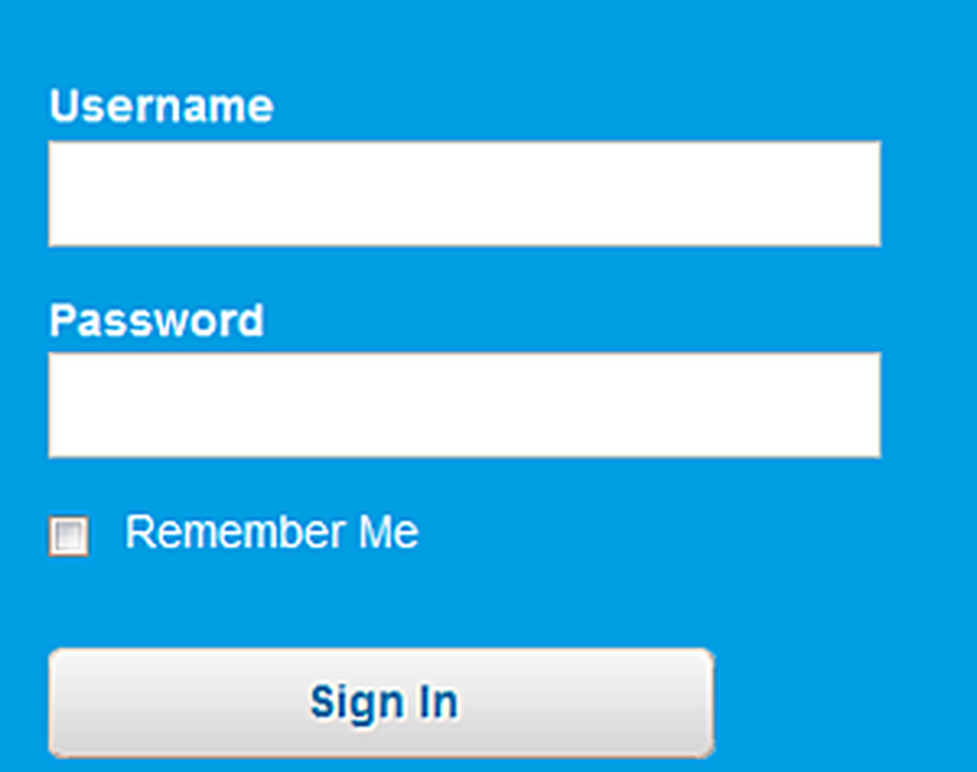
Please change your password during the first login. You can find the settings for this under menu item ADMINISTRATION / Profile on the administration portal. Passwords cannot contain colons. The password must contain at least 1 upper case letter, 1 lower case letter, 1 number, 1 special character.
The administration portal is optimised for the latest versions of the Internet Explorer and Mozilla Firefox. Display errors can occur with older versions.
After a successfull login the following window appears:

If the login does not work, verify wheter caps lock key is enabled and try again.

If you do not remember your password, ask for a new one by pressing "Forgot password".

Enter your Login-id (Kxxxx) and retype the Text verification number. Now press the button Next.

After you inserted the christian name of the contact person, press the button "send new password". A new Password is sent to the email adress.
No content available.
You can select all functions in the navigation line.
1. The function Welcome opens the "NEWS" section.


4. The function DID is described in C 6. DID.
5. The function Help opens our main documentation page.
Description of the main and list window, example Targets.

| Number | Description |
| 1. | If you click in these areas, the rows are sorted (a-z or z-a). |
| 2. | Helptext for thi function. |
| 3. | Select specific information by entering name or part of a name (names,numbers and so on). |
| 4. | Typ selection. |
| 5. | Reset filter and rows selection. |
3. Here you can select the criterias for 3a.


5.Here you can reset the filter and select with rows should be shown.
![]()
2. Result area (List), e.g. "Targets".

| Number | Description |
| 1. | Here are the symbols of the different Services, e.g. phone extensions, eFax. |
| 2. | Here the names of the services are shown. |
| 3. | The assigned extension is shown. |
| 4. | The assign service number. |
| 5. | Which type of services. |
1. Next symbols are available:

You can select every item.

 You can edit your selection and a new confiration-window is opened.
 You can delete the seleted item.
You can mark
multiple extensions, devices and phonebook entries by holding the CTRL
key or CMD key and clicking on the entries simultaneously. On the lower
part of the monitor you can delete an entry by clicking the red delete
smybol .
3. Footer line, e.g. Targets.

If you push the ADD Symbol you can add a new target:
In the right corner of the footer line you can see the number of objects.
If you select one or more List-elements (e.g. under Targets) and you open them (double-click), then the selected items are opened in a new configuration window, using different tabs for every item. You can select more then one item and you can close them by clicking the X. If you have made changes in a tab, then the header information in the tab is in italic.

No content available.
Definition phone extension:
An extension is always the internal number, i.e. you reach participants and services within the company without dialing a “0” first. This internal number is completely independent of the direct dial (external number). Extensions could be also defined without a direct dial (just internal extension) or with a different direct dial for an external caller.
How to edit a Phone Extension?
Example:
You want to create an extension, which is accessible internally under the number 111, externally by calling +49 123 456789-111 and the phone number +49 123 456789-112. Furthermore, this extension will also have a desk phone as a device. If the extension isn’t available within 30 seconds, the caller will be forwarded to the voicemail of the extension.
Instructions:
- First, name the extension. Usually the extension name corresponds to the employee's name (example: John Doe).
- Second, assign an extension number. The employee can now be reached at this extension number within the company. If you have only one trunk line, then a direct dial (external number) is created automatically. If you have multiple trunks, you need to choose a "Preferred Outbound Trunk" in the "Configuration". Afterwards, the direct dial will be created automatically. Then your extension is externally accessible at the direct dial +49 123 456789-111. Insert +49 123 456789-112 in the dialog window "Inbound Numbers" to ensure that your extension is also externally accessible at this number. You also have the option to be available only via the second number.
- Finally, select a device. You see a drop-down list with all available devices (the MAC addresses of the devices are shown). The device that you select is immediately accessible at the extension.
- Furthermore, you can also configure the settings such as Voicemail, function keys (BLF), call forwarding, etc. Activate your voicemail and upload your personal announcements, set a parallel ring, if desired, or configure the function keys (BLF) on your desk phone (snom).
Configuration:
Click on Targets in the navigation area. In the main window you can add a new phone extension by clicking the ADD symbol and select phone extension, or double click on an existing phone extension element to change this entry.
You can also define a skill group and skill level in the configuration part of an extension.
A new window with "phone extension" with several sections is shown.
| Section | Picture |
| Name and extension | |
| Referenced by | |
| Inbound numbers | |
| Phone devices | |
| Voicemail | |
| Call forward |  |
| Geographical settings | |
| Configuration |  |
| Function keys |

| Fieldname | Description |
| Name | Please assign a concise name to your extension (for example, John Doe). |
| Extension (internal number) | Enter the extension number. |
This feature allows the user to see where his extension has been referenced.

| Field name | Description |
| Name | The name of the service that references your extension. |
| Type | The type of service that references your extension, e.g. an extension, a conference service, a queue service, etc. |
| Description | Here you can see how your extension is being referenced, e.g. what function key referenced your extension. |
Note that the "Referenced by" feature is only described in detail in this chapter. It appears in all the following chapters, e.g. Conference Service, Time Control Service, Queue Service etc. Since the fields of the "Referenced by" feature are identical in every section, the description is only given once.
Assignment of DID.

| Fieldname | Description |
| Base number | The direct dial number is automatically assigned according to your extension, once a main outside line has been selected. However, you can also assign multiple direct dial numbers. Simply click on “Add” button and define a new, additional direct dial number. |
| Extension | Assign extension Exception: If you have only one direct dial number, then it is not necessary to assign it. |
Assign a direct dial number
1. Push the Add-Button to "Add new Inbound Trunk Number".
2. Select "your" dial number and extension.
3. Confirm your input by pushing the Confirm-Button.
Change the direct dial number
1. Select the entry which should be changed.
2. Push the Change-Button.
3. Change the direkt dial number or the extension number.
4. Confirm your input by pushing the Confirm-Button.
Deleting a direct dial number
1. Select the entry you want to delete.
2. Push the Delete-Button.
| Icons | Function |
| Add button. | |
| Delete button. | |
| Edit button. | |
| Confirm button, saves changes. | |
| Cancel button. | |
| Close selection. |
Assignment phone device to an extension.

| Fieldname | Description |
| Device-ID | Contains a list of all available devices. The devices shown are the MAC addresses for the telephones. Please select an device for your extension. |
| Site | Define the site whre you use your phone device. (This is very important for Emergency calls). |
| Device name | Name of the phone device, e.g. snom320. |
| Device type | Type of the phone device, e.g. standard-phone. |
| Primary device | see C 3.1.11. Premium-extension |
The phone devices are either configured under Elements/Devices or your provider has them pre-configured.
Assign phone device
Push the Add-button to "Add new Device".
Select from the free-device-list, "your" device for this extension.
Confirm your selection with the Confirm-button.
Change phone device
Select the device you want to change.
Push the Change-button.
Select a new device.
Confirm your selection with the Confirm-button.
Delete phone device
Select the device you want to delete.
Push the Delete-button.
| Icons | Function |
| Add button. | |
| Delete button. | |
| Edit button. | |
| Confirm button. | |
| Cancel button. |
Assign a voice mail function to an extension.

| Fieldname | Description |
| Password | Specify a password for your voice mail. You need it to access voice mail from outside or directly from your desk telephone. |
| Say CID | CID stands for Caller ID. That is, when retrieving a voice mail, the caller’s telephone number is announced. |
| Say date/time | Specify whether or not to announce the date and time of the voice mail when retrieving your voice mail. |
| Email address, where a copy of the voice mail will be sent to. | |
| Send email | Confirmation, that copy have to be sent. |
| nfon News accepted | Shall nfon News be send to email address. |
| Delete after send | Set the voice mail to be deleted after being emailed. |
| Temporary | Upload announcement file for temporary announcements. |
| Busy | Upload announcement file if busy. |
| Unavailable | Upload announcement file if not available. |
| Name | Upload announcement file for name announcements. |
Temporary:
If you add an announcement, it overrules all other announcements and it is directly active. Usefull for absence announcements etc.
Busy:
Announcement, if extension is busy.
Unavailable:
This announcement is played, if you have set in "Call forward (next section)" the field "Not available" to "Own voicemail".
Name:
This announcement is played before your standard voicemail announcement if you have not defined another announcement.
Just click on the ADD-button to upload an anouncement.
A new window is opened. You can search "your" announcement file. Play the selected announcement by pushing the Play-button.
You can upload the following announcement formats:
- MP3
- WAV
| Icons | Function |
| Add | |
| Delete selected item | |
| Play announcement | |
| Activate selection |
Here you can define, manage and edit call forwardings.

Make sure to deactivate the option "call waiting indication" in the extension to be able to carry out the call forwarding when busy. If the option "call waiting indication" is active, the "busy" mode is not available.
| Field name | Description |
| Parallel ringing | Enter any additional number to which the call can also be forwarded to. This is usually your mobile phone. In this case, the system telephone and the mobile phone both ring and you can then choose which phone to answer. If, for example, the call is answered with the mobile phone, it can no longer be answered with the PBX phone. |
| Signalised number on call forwards | Define the telephone number which will be shown to the target recipient. The following options are available: a) Show the caller’s telephone number b) Show the the callee’s telephone number c) Show the telephone number of the forwarding extension. |
| Allow external numbers | Here, you can determine whether or not this specific extension is permitted to configure call forwarding to outside telephone numbers. However, you can also specify globally for all extensions whether or not external telephone number are permitted. This can be done in the menu item Administration 5.1 Profile. |
| Profile | Profile refers to the call forwarding profile. Create a new call forwarding profile or edit existing call forwarding profiles. Up to 10 call forwarding profiles are available per extension. One of the profiles is the default call forwarding profile, which is automatically available on each extension.The other 9 call forwarding profiles can be freely defined by the user. |
| Rule set | Define a rule set for a call forwarding profile. Four call forwarding conditions are available in a rule set. Here you can define what should happen with an incoming call. |
| Source | Source of the incoming call, e.g. all calls (catch all). |
| Default | Call forwarding condition: destination for unconditional call forwarding. A call is always forwarded to the number defined here. |
| Busy | Call forwarding condition. Here you define to which destination the call will be forwarded to, e.g. a different phone number or voice mail, if your extension is busy. |
| Not available |
|
| Timeout (seconds) | Timeout for the extension, i.e. after how many seconds the caller will be forwarded accordingly. The timeout applies to call forwarding in case of no answer. |
| Not registered | Call forwarding condition: Your device is not registered on the telephone system (e.g. broken cable etc.). All incoming calls will be forwarded to a defined destination. The caller will then be forwarded directly to the defined destination. |
Parallel ringing
Usually, you assign here your mobile telephone number. In case, you have a ssigned your mobile telephone number, the extension AND on the mobile device will ring. You can now choose what device you prefer to take the call on. If you select your mobile device, then it is not possible to redirect the call to your extension.
If a call forward is set to an external number, e.g. a mobile device, a dial prefix has to be added. Example: 0 0049 171 xxxxx.
| Icons | Function |
| No action. | |
| Voicemail. | |
| Close selection. | |
| Activate selection. | |
| Select, all possibilities are shown. |

| Fieldname | Description |
| Language | Here you define the language for your device, all settings, e.g. phone menu, language of the voicebox and so on, are set to this language. |
| Dial prefix | Default is the prefix of your site, you can select for this device if the prefix is 0 or 9. It has no influence on the site settings! |
| Use TPS | Here you can activate or deactivate the TPS service by clicking on the box. |
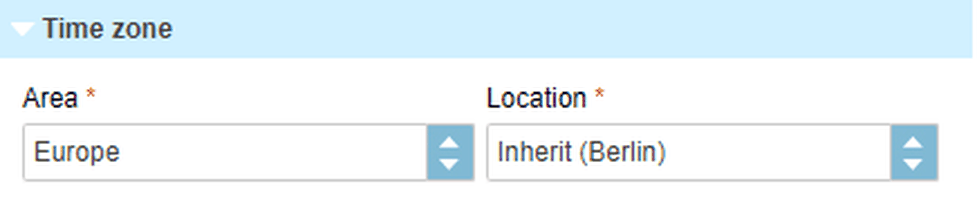
| Time zone | Here you can define your time zone. Select the area and the location. |
TPS (Telephone Preference Service) is a service available in UK.
TPS currently contains more than 20.5 million phone numbers. As part of a regulatory requirement, it is compulsory to match outbound dial attempts to this list. If the dialed number matches an entry in the list, the calling person must be informed that the number dialed is in the TPS. The dialing person may override the warning and then still place the call.
How can TPS be activated:
- Click on the box "Use TPS".
Once the feature is enabled for the specific extension and this extension is placing a call, the external number will be matched with the TPS database.
The caller will be warned via a voice prompt that the callee has subscribed at the TPS, if the number matches with the database.
The dialling party has the option to overrule the call by pressing the DTMF key 1 (as stated in the announcement). If the dialling party does not press the overruling key, then the call will be terminated.
The TPS service is availble in UK only!
Extension configuration.

| Fieldname | Description |
| Permission | Specify direct outward dialing for the extension. I.e., this extension can make: internal, local, national, international or international free (contact support to enable this option) outgoing calls.* |
| CTI | Define, which CTI is used by this extension. |
| Language | Select your extension's language. |
| Access central phone book | Specify if this extension is permitted to access the main phone book. |
| Preferred outbound trunk | Select your preferential outside line for outgoing calls. I.e., which outside line would you like to use to phone “out”. This outside line is then also displayed to the other party. Note: You also have the option of indicating a different main number for outside calls other than the one specified here, by first dialling # + line number (see 6. DID). |
| When recording | When do you want to record. To allow this, it has to be set for the complete site! If you have set this "on demand", then you can activate or deactivate it with "*+1". The informations "who will be informed" and in what kind of format (MP3 or Wav) is set in Administration/Profil. The recorded file is then sent to the email-address, set for this extension. |
| Suppress extension in phone book | Specify if your extension should be visible in the main phone book. |
| CLIR | Here you decide, how your extension number is shown extern. Show the complete telephone number or only the main number (outside line, e.g. +49 89 1234-0) or no telephone number at all (block caller ID). If you select show Pilot then the main number is shown without 0 8e.g. +49 89 1234) |
| Cost center | Specify a cost centre number for the respective extension. This cost centre is listed in the itemised statement. |
| Intercom enabled | Intercom activation. |
| Number guessing length | Specify after how many characters entered on the end device a telephone number should be suggested. The suggested telephone numbers are based on the saved call history. |
| Caller return after failed transfer (seconds) | Specify after how many seconds a call should automatically be transferred back. if a transfer (unattended) fails. That is, if e.g. the other party is not available or busy. (0 – 25 seconds) |
| Call waiting indication | Specify if “call waiting” is allowed for this extension. When this function is deactivated, the caller is sent to voicemail (…if busy). |
| Auto dial timeout | Specify how many seconds after entering the telephone number a call should automatically be initiated. |
| Displayed extension for internal calls | Specify which extension number to display for internal calls with colleagues. For example, your extension is 111, but for internal calls you wish to display your assistant's extension 112. |
| Callcenter agent | Specify if this extension is a call center agent. This information is only relevant when using call center monitoring. |
| Customer contract | In case you own multiple contracts, select your contract here. The option is only available for customers with multiple contracts. |
| CCBS/CCNR | CCBS = Completion of Calls to Busy Subscriber CCNR = Completion of Calls on No Reply |
| Allow Ncontrol login | Has this extension the right to log in to Ncontrol? By default all new customers can log into Ncontrol. |
| Click-2-Dial | Can this extension use Click-2-Dial? |
| Nmeeting+ | You can see here, whether the Nmeeting+ client is used and how it is billed. (flatrate / units). |
| Voice Recording Profile | Here you can choose a voice recording profile. By default, calls are not recorded. If you need that feature, please choose a recording profile. |
| Require PIN for external calls | You need to enter a PIN (your voicemail PIN) in order to make external calls. In case the PIN will not be entered, the external call will not be carried out. |
| Skill Options |
|
| Skill-Set: Login/Logout |
When the button is green, the extension is logged off. Click the button to activate the extension.
If the button is red, the extension is logged on. Click the button to deactivate the extension. |
| Outbound numbers | Here, only exceptions to the rule are defined. Furthermore, this setting only applies if “Show complete telephone number” is selected under display telephone number. If for example your direct dial number is 111 but you wish to show direct dial number 112 for outgoing calls, you can configure that here. You can define modifications for each outside line. Simply click on the Add-button and select an outside line and enter the direct dial number you wish to show for outgoing calls. |
*What is the difference between 'international' and 'international free'?
‘International’ - If the next 2 digits after the external line prefix are 00, then it’s an international call. Blacklisted prefixes are still blocked.
‘International free’ – There is a blacklist of 1331 prefixes that are considered very high cost or high risk destinations. International free is the only option that bypasses this list.
Intercom
On the one hand, this function allows you to monitor other parties’ extensions on your system and on the other hand, accept their calls or forward calls to them. When a call comes in to a monitored extension, the respective LED flashes - you can now answer the call by pressing the key (please note that this function only works if the administrator of your telephone system has added you to a mutual "Pick-Up Group" with the extensions being monitored). When the monitored extension is on a call, its LED remains lit. If your phone is ringing and you wish to ignore the call and send it to another extension, press the function key assigned to this extension - the call is then forwarded to it. However, in addition to the above functions, the main idea behind this "Intercom" function is being able to speak directly to the extension assigned to the respective function key (type:intercom) by pressing the function key (intercom). However, "Intercom" must be activated on the other party’s telephone for this purpose. Intercom refers to a conventional intercom system (similar to walkie-talkies), directly connecting you to the other party’s speaker by pressing the assigned function key.
Call waiting
Call waiting means that if you are on a call and a new caller tries to reach you, a subtle waiting tone informs you that someone else is trying to reach you. You can then decide whether or not you wish to answer the call (although you are already on a call). The voicemail function "Call forwarding if busy" does not work if “Call waiting" is activated!
If this function is deactivated and a person tries to reach you while you are on a call, the caller is forwarded to voicemail (…if busy).
| Icons | Function |
| Add | |
| Delete selected item | |
| Scroll | |
| Save selection | |
| Close without saving | |
| Close selection |
Assignment of the function keys.

| Fieldname | Description |
| # | Enter the keypad number you wish to assign. The function key sequence on your desk telephone depends on the type of telephone. Therefore, please refer to the manual for your desk telephone for the layout of function keys. You can assign keys 0 to 137. |
| Extension | Select the destination for the respective type. |
| Displayed name | option of assigning a concise name to your keypad number. |
Examples:
Call forwarding:
Call forwarding to your mobile device number 0171 12345 with the function key 1.
1. Push the Add-symbol.
2. Select function-key 1.
3. Enter *110017112345. (*11 for call forward, then 0 or 9 depending on the call number for external calls!).
4. Then confirm the line with the function-symbol.
5. Push the Confirm-symbol.
You can set another function key with *11 to deactivate the call forward.
Busy Field Light (BFL):
The "Busy Field Light (BFL)" function allows you to monitor other parties’ extensions on your system and pick up calls from these extensions or forward calls to them. When a call comes in to a monitored extension, the respective LED flashes - you can now answer the call by pressing the key (please note that this function only works if the administrator of your telephone system has added you to a mutual “pick-up group" with the extensions being monitored). When the monitored extension is on a call, its LED remains lit. If your phone is ringing and you wish to ignore the call and send it to another extension, press the function key assigned to this extension - the call is then forwarded to it.
Intercom:
The "Intercom" function also includes the functions described under "Busy Field Light (BFL)”, in addition to directly being connected to this extension when pressing the function key (intercom). However, "Intercom" must be activated on the other party’s telephone for this purpose. Intercom refers to a conventional intercom system (similar to walkie-talkies), directly connecting you to the other party’s speaker by pressing the assigned function key.
Function code:
Entering various codes (per the list on the last two pages of this manual) enables you to additionally program functions such as call forwarding to the keys. To do so, simply enter the code with the desired number in the entry field.
Services:
You can also assign a service (e.g. a group) to the function keys. Unlike an extension (BFL), this service cannot be monitored! I.e., this service is then only available via the function key.
| Icons | Function |
| Add | |
| Delete selected item | |
| Edit | |
| Save selection | |
| Exit without save |
Definition of premium extension (Premium version)
The premium extension manages up to 9 devices with one extension. The Premium version has a separate tariff. Please contact your sales representative about this option.
This tariff can only be booked for the entire telephone system, not for individual extensions. Invoicing is based on the extensions used. Service extensions such as e.g. for a virtual conference room, do not count as billable extensions and continue to be free of charge. I.e. the premium version does not bill per activated end device but per extension used (except service extensions).
Example:
You use one telephone at the office and one at your home office. Furthermore, when you’re on the go, you also use your softphone on your laptop as well as an FMC client on your mobile phone. With the premium extension, you can assign all of these end devices to one single extension and only need to manage the settings for the extension once because they are automatically copied to all devices. This eliminates different settings for voicemail, call transfers, function keys, etc., given that all settings are configured centrally via the premium extension. You are then available on all end devices with just one telephone number. I.e., all devices for a premium extension ring at once. To occasionally deactivate this, simply activate the DnD function (Do not Disturb) on the telephones you do not want to ring. Monthly costs are then billable per extension and no longer per activated device.
Some functions do not work with multiple telephones. This is e.g. the case with queues or the “Forward calls if not registered” function. Therefore, the premium extension always has a primary device. You can recognise this on the telephone; it is indicated by the extension name on the display being preceded by an asterisk (*). If the extension is assigned to a queue, the primary device is always used for queues. The “Forward calls if not registered” function can only be used with the primary device. I.e., this call forwarding rule only applies if the primary devices loses its registration. If another end device on the premium extension, other than the primary end device, loses its registration, The forwarding "On unavailable/not registered" only works if all end devices of the extension are not reachable. In case of Cloudya Mobile, FMC, LYNC, parallel call or other devices this option cannot be used,
since these terminals are "always" accessible due to their characteristics.
In the administration portal, within the navigation item "Targets/Phone extensions/Section Phone devices" it is possible to add up to 9 devices to an extension. One of the extensions must be declared as "Primary device". You can assign this to a device by activate it in the column "Primary device".
Extension settings
The upgrade "Premium package" only includes the handling with multiple devices for one extension. All other settings and fucntions, e.g.queue services, remain unchanged.
For the general configuration of a premium extension, please see 3.1. Phone extension.
Definition
You can create a telephone conference with up to 50 participants, they can dial in and communicate with each other. There are different rights for the conference leader and the participants. The conference leader for example can mute all participants.
How do I configure a telephone conference:
Example:
You want to create a conference which is internally available by calling the extension 300.
Instructions:
- Enter a short name for your conference.
- In addition please remember the admin and user PIN. These are important to log into a conference.
- Optionally you can make additional settings, such as the announcement of a new participant in the conference, etc.
- Now you assign the extension number 300 to your conference, so that it is internally accessible.
- If you have only one trunk line, then a direct dial is created automatically. If you have multiple trunks, and the conference needs to be accessed externally, please submit the direct dial +49 123 456789-300 via the dialog box „Inbound Numbers“. Now the conference is externally accessible.
Configuration
In the administration portal under "Targets", click on the ADD-button and select a new telephone conference. You can also edit an existing conference by double-click.
A new window with "New Conference service" with several sections is shown:
| Sections | Picture |
| Name and Extension | |
| Referenced by | |
| Inbound numbers | |
| User options | |
| Admin options | |
| Conference options |
Standard information for conference service.

| Fieldname | Description |
| Display name | Assign a concise name to your telephone conference. |
| Extension number (internal number) | Enter the extension number. Not assigning an extension number results in the extension not being available internally. |
Assignment of DID.

| Fieldname | Description |
| Base number | The direct dial number is automatically assigned according to your extension, once a main outside line has been selected. However, you can also assign multiple direct dial numbers. Simply click on “Add” button and define a new, additional direct dial number. |
| Extension | Assign extension Exception: If you have only one direct dial number, then it is not necessary to assign it. |
Assign a direct dial number
Push the Add-Button to "Add new Inbound Trunk Number".
Select "your" dial number and extension.
Confirm your input by pushing the Confirm-Button.
Change the direct dial number
Select the entry which should be changed.
Push the Change-Button.
Change the direkt dial number or the extension number.
Confirm your input by pushing the Confirm-Button.
Deleting a direct dial number
Select the entry you want to delete.
Push the Delete-Button.
| Icons | Function |
| Add button. | |
| Delete button. | |
| Edit button. | |
| Confirm button, saves changes. | |
| Cancel button. | |
| Close selection. |
User options:

User Options:
| Fieldname | Description |
| User pin | Assign the PIN for the participants. The PIN is needed to dial into the conference. The PIN for the conference chair and the PIN for the participants cannot be the same. |
| Announce user count | Announce the number of users already connected to the conference. |
| Permanently mute | All user are in mute mode, only the conference administrator can talk. |
| Signal join/leave | Acoustic signal if a user joins or leaves the conference. |
| Announce joins/leaves | Announce all joins and leaves (by name). |
Admin options:

| Fieldname | Description |
| Admin pin | Assign the PIN for the conference chair. The PIN is needed to dial into the conference. The PIN for the conference chair and the PIN for the participants cannot be the same. |
| Announce user count | Announce how many users are locked in. |
| Signal join/leave | Acoustic signal if somebody joins or leaves the conference. |
| Announce joins/leaves | Announcement of joins and leaves (by name). |
| Close at exit | End of conference, if the administrator leaves the conference. |
| Lock until entry | All users hear music on hold until the administrator (conference leader) has locked in. |
| Icons | Function |
| Activate function | |
| Dropdown |
Conference options:

| Fieldname | Description |
| Language | Select the language for the conference room. |
| Music if single user | Standard music on hold if single user. |
| Icons | Function |
| Activate function | |
| Dropdown |
Definition time control service:
A caller can only indirectly recognise a time control. That is, the caller is guided according to the time. For instance, this function is used for a company’s business hours. Monday to Friday (9 am to 6 pm), callers should reach the company staff as usual. Calls outside the specified time are then routed to the company mailbox for example. A time control only recognises 2 intervals (Monday to Friday (9 am to 6 pm)). If for example you also have a lunch hour and callers need to be routed to the company mailbox from 12 pm to 2 pm, you must link 2 time controls to each other (exception).

How to configure a Time Control?
Example:
You want to create a time control, which is accessible externally by calling +49 123 456789-111. In addition the time control should be defined from Monday to Friday, 8:00 to 18:00. Anybody calling within this time will be forwarded to the employee group. If someone calls beyond the specified time, he should be forwarded to thecompany mailbox.
Instructions:
Enter a short name for your time control.
Next create the direct dial +49 111 456 789-300 in the dialog box "Inbound Numbers", so your time control is accessible for external calls. However, you can also add more direct dials.
Please define finally the period of your time control:
- From : Monday To: Friday
- From Time: 08:00 To Time: 18:00
- Destination if Allowed: Group Staff
- Destination if Denied: Company - Mailbox
Special case:
If you still have a lunch break from 12:00 to 14:00 and it is therefore necessary to forward the caller to the company voicemail, you need to connect the two time controls with each other (special case).You create a new time control and define first of all the third interval. I.e., Monday to Friday 12 am to 14 pm. Next choose the the company mailbox as "Destination if Allowed" and the employee group mailbox as "Destination if Denied". Now go back into the existing time control and select the just created new time control as "Destination if Allowed". Thus you have both connected and calls can reach you from Mondays to Fridays from 8 am to 12 am and 2 pm to 6 pm.
Furthermore, you still have the option to set special rules. For example if a public holiday is on weekdays, there you can specify the time control to behave as if it were outside of business hours.
Configuration:
In the serviceportal under "Targets" you click on the ADD-button and select a new time control service. You can also edit an existing time service by double-click.
A new window with "New time control service" with several sections is shown:
| Sections | Pictures |
| Name and extension | |
| Referenced by | |
| Inbound numbers | |
| Timezone settings |  |
| Time frame | |
| Destinations | |
| Time control exceptions |
Standard entries for Time control:

| Fieldname | Description |
| Display name | Assign a concise name to your time control service (e.g. peak sales period). |
| Extension number (internal number) | Enter the extension number. |
| Evaluation strategy | When selecting “Automatic”, the configured time control triggers according to the specified period. |
Assignment of DID

| Fieldname | Description |
| Base number | The direct dial number is automatically assigned according to your extension, once a main outside line has been selected. However, you can also assign multiple direct dial numbers. Simply click on “Add” button and define a new, additional direct dial number. |
| Extension | Assign extension Exception:If you have only one direct dial number, then it is not necessary to assign it. |
Assign a direct dial number
1. Push the Add-Button to "Add new Inbound Trunk Number".
2. Select "your" dial number and extension.
3. Confirm your input by pushing the Confirm-Button.
Change the direct dial number
1. Select the entry which should be changed.
2. Push the Change-Button.
3. Change the direkt dial number or the extension number.
4. Confirm your input by pushing the Confirm-Button.
Deleting a direct dial number
1. Select the entry you want to delete.
2. Push the Delete-Button.
| Icons | Function |
| Add button. | |
| Delete button. | |
| Edit button. | |
| Confirm button, saves changes. | |
| Cancel button. | |
| Close selection. |
Zeitzonen Einstellungen
Set here the time zone valid for this region and city.
Find a detailed overview of the possible settings here.
Timeframe of the time within the time control. Definition of "from day" till "to day" and "from time" till "to time"

| Fieldname | Description |
| From day | Define the starting day for the timing control. I.e."From day:" Monday. |
| To day | Define the ending day for the timing control. I.e. "To day:" Friday. |
| From time of day | Define the starting time. I.e. 09:00. |
| To time of day | Define the ending time. I.e. 18:00. |
Definition of activities inside and outside of the time control.

| Fieldname | Description |
| Destination if allowed | Define a period during which an action should occur (e.g. Time control for sales). |
| Destination if denied | Define the destination for within or outside the period (e.g. company mailbox). |
Time control exceptions, Definition of e.g. bank holidays.

| Fieldname | Description |
| Fixed referral to"destination if allowed" | Specify exceptions, on which days the time control should be set to “Always within" or “Always outside" Several days can be set, you add a day by clicking the ADD-button, then you can select the day by clicking the button |
| Fixed referral to "destination if denied" | Specify exceptions, on which days the time control should be set to “Always within" or “Always outside" Several days can be set. |
| Icons | Function |
| Add. | |
| Delete selected item. | |
| Calender. |
Definition Queue
A queue is used for the "consolation" of the customer, for example, if there is not enough staff available to answer a call directly. This function is, among other things, used for hotlines.
How to edit a Queue?
Example:
You want to create a queue that is internally accessible at the extension 101. Furthermore 2 employees (Agent 1 and Agent 2) should be members of the same queue. If none of the two is available within 60 seconds, the caller will be forwarded to the voice mail of the team leader. Furthermore, the queue is the target for the time control 1 (main time).
Instructions:
1. Enter a short name to your queue and select whether it is an inbound or outbound queue.
2. Allocate the extension number 101 to your queue, so it is accessible internally. If you have only one trunk line, the direct dial (external number) is created automatically. If you have multiple trunks and the queue should be reachable externally, please submit the direct dial +49 123 456789- 101 via the dialog box "Inbound Numbers (external numbers)".
3. Now the queue is available for external calls.
4. Finally select the agents (members) of the queue. In this example these are the extensions "Agent 1" and "Agent 2".
You also define a timeout of 60 seconds and choose the voice mail of the team leader for the "Destination on rejection".
Configuration
In the serviceportal under "Targets" you click on the ADD-button and select a new queue service. You can also edit an existing queue service by double-click.
A new window with "New group service" with several sections is shown:
| Sections | Pictures |
| Name and extension | |
| Referenced by | |
| Inbound numbers | |
| Members | |
| Direction options | |
| Customer options | |
| Member options |  |
Standard information for queue service

| Fieldname | Description |
| Display name | Enter a concise name for your queue. (e.g: Queue Logistics). |
| Extension number (internal number) | Enter the extension number. If no extension number is assigned, the extension cannot be reached internally. |
| Weight | The field “Weigth" allows you to prioritise individual queues. The value range is 0-255. The higher the assigned value, the higher the importance of the queue. Thus number 2 has a higher priority than 1, 3 higher than 2, etc. |
Assignment of DID.

| Fieldname | Description |
| Base number | The direct dial number is automatically assigned according to your extension, once a main outside line has been selected. However, you can also assign multiple direct dial numbers. Simply click on “Add” button and define a new, additional direct dial number. |
| Extension | Assign extension |
Assign a direct dial number
1. Push the Add-Button to "Add new Inbound Trunk Number".
2. Select "your" dial number and extension.
3. Confirm your input by pushing the Confirm-Button.
Change the direct dial number
1. Select the entry which should be changed.
2. Push the Change-Button.
3. Change the direkt dial number or the extension number.
4. Confirm your input by pushing the Confirm-Button.
Deleting a direct dial number
1. Select the entry you want to delete.
2. Push the Delete-Button.
| Icons | Function |
| Add button. | |
| Delete button. | |
| Edit button. | |
| Confirm button, saves changes. | |
| Cancel button. | |
| Close selection. |
Assignment of queue functions. Definition of activities inside and outside of the time zone.

| Fieldname | Description |
| Display name | You have the option of assigning individual members to the queue. |
| Penalty | Prioritising members within a queue (penalty). You can assign the priority of members from the drop-down. The lowest number always has the highest priority. Thus number 0 has a higher priority than 1, 2 is higher than 3, etc. By default all members within a queue have the same priority. |
| Timeout delay (in seconds) | Enter a timeout for the group. I.e., after how many seconds should the caller be rerouted accordingly? |
| Destination on timeout | Define the destination on timeout. |
| Destination on rejection | Specify if the caller should be ignored if no member is logged into the queue. If this is activated, you then also need to specify a destination to route the call to. |
| Join queue without membership | If there are no members in the queue, you can decide if a caller can phone this queue. If not set and no agent is in the queue, all callers are redirected to the destination set in the "Destination on timeout". |
| Icons | Function |
| Add | |
| Delete selected item | |
| Edit | |
| Save selection | |
| Quit without save | |
| Activate function |
Direction options:

| Fieldname | Description |
| Record calls | No function. |
| Direction | Definition of the called direction. Is this an inbound- or an outbound queue. Normally it will be an inbound queue. (inbound means incoming calls). |
Customer options:

| Fieldname | Description |
| Initial | Select the announcement to play for the caller upon entering the queue. |
| Postion announcement interval | Specify the delay or the interval to be used for playing the periodic and position announcement. If an invalid value is entered, the system suggests a valid value. |
| MoH/Ring | Music on Hold. Select whether the customer in a queue should hear the regular “ringing”, the system’s standard hold music or a specific hold music. First, the hold music for the queue has to be uploaded under menu item ELEMENTS/Announcement. |
| Periodic | Periodic announcements are repeated while the caller is waiting. The announcement can also be uploaded to the system under menu item ELEMENTS/Announcement or uploaded by the Add-button. |
| Periodic announcement interval | Specify the delay or the interval to be used for playing the periodic and position announcement. If an invalid value is entered, the system suggests a valid value. |
| MoH (if not ringing) | Music on Hold. When "Custom" is selected under "MoH/Ring" you will be able to select a custom hold music. The hold music for the queue can either be uploaded under menu item ELEMENTS/Announcements or selected by the Add-button symbol. |
You can play the announcement/MoH, if you push the Play-button.
| Icons | Function |
| Add button. | |
| Dropdown. | |
| Play button. |
Member options:

| Fieldname | Description |
| Selection strategy | Select from the following options: All at once, Random, Longest pause first, “Round Robin” successively |
| Time to wait after timeout | Specify after how many seconds the system should attempt to reconnect the caller to the agent. |
| Report hold time | Select if the members of the queue should be informed about the customers waiting time. |
| Timeout per member | Enter a timeout for the member. I.e., after how many seconds should the call be returned to the queue? |
| Wrap up time per member | Specify how much time a member has to register a completed call before being offered the next call. |
| Member announcement | This allows you to play an announcement to the agent before accepting a call. For example, if a member works several queues, it may be useful to indicate which queue the caller dialed. The queue name is also shown in the telephone display.The announcement can be uploaded by the Add-button. You can also play it by pushing the Play-button. |
| Icons | Function |
| Add | |
| Dropdown | |
| Play |
Definition Queue:
A Skill is used to optimize a hotline. You can define skill groups and skill-levels within a group.
How to edit a Skill?
You defined a hotline, accessible under the extension number 110. You offer this hotline support in two languages and you have hotline memebers (extensions) who handle this support either in english or in german. Those members can have differnt experience levels (skill-level), e.g. 10=Senior support, and 1=low level support.

Instructions:
- You have an announcement, e.g. "dial 1 for english support or 2 for german support.
- Now you define two skill groups, one names Support-EN the other with Support-DE.
- Now you add those extensions to the skill group, who will bring the support and you define his skill level. The caller is directed to the extension with the highest skill level (if available).
- You must direct the IVR to the skill groups.
- You can also add an extension to a skill under Targets/Phone extensions.
Configuration:
In the serviceportal under "Targets" you click on the ADD-button and select a new Skill service. You can also edit an existing Skill service by double-click.
The extensions can subscribe to his skill set by the function-code *87, to unsubscribe please use **87.
A new window with "New Skill service" with several sections is shown:
| Sections | Pictures |
| Name and extension | |
| Referenced by | |
| Inbound numbers | |
| Skill Options | |
| Direction options | |
| Customer options | |
| Member options |  |
Standard information for queue service

| Fieldname | Description |
| Display name | Enter a concise name for your queue. (e.g: Queue Logistics). |
| Extension number (internal number) | Enter the extension number. If no extension number is assigned, the extension cannot be reached internally. |
| Weight | The field “Weigth" allows you to prioritise individual queues. The value range is 0-255. The higher the assigned value, the higher the importance of the queue. Thus number 2 has a higher priority than 1, 3 higher than 2, etc. |
Assignment of DID.

| Fieldname | Description |
| Base number | The direct dial number is automatically assigned according to your extension, once a main outside line has been selected. However, you can also assign multiple direct dial numbers. Simply click on “Add” button and define a new, additional direct dial number. |
| Extension | Assign extension Exception: If you have only one direct dial number, then it is not necessary to assign it. |
Assign a direct dial number
- Push the Add-Button to "Add new Inbound Trunk Number".
- Select "your" dial number and extension.
- Confirm your input by pushing the Confirm-Button.
Change the direct dial number
- Select the entry which should be changed.
- Push the Change-Button.
- Change the direkt dial number or the extension number.
- Confirm your input by pushing the Confirm-Button.
Deleting a direct dial number
- Select the entry you want to delete.
- Push the Delete-Button.
| Icons | Function |
| Add button. | |
| Delete button. | |
| Edit button. | |
| Confirm button, saves changes. | |
| Cancel button. | |
| Close selection. |
Assignment of skill functions. Definition of activities inside and outside of the time zone.

| Fieldname | Description |
| Display name | You have the option of assigning individual members to the skill. Simply click on the ADD-button and select the respective extensions. You can also edit (Edit-button) or delete (Delete-button) an existing entry. |
| Skill Level | The skill level defines the quality of service of this extension. The higher the skill level, the better the service, e.g. 10=Senior service, 3= Basic service. |
| Timeout delay (in seconds) | Enter a timeout for the group. I.e., after how many seconds should the caller be rerouted accordingly? |
| Destination on timeout | Define the destination on timeout. |
| Destination on rejection | Specify if the caller should be ignored if no member is logged into the queue. If this is activated, you then also need to specify a destination to route the call to. |
| Join queue without membership | If there are no members in the queue, you can decide if a caller can phone this queue. If not set and no agent is in the queue, all callers are redirected to the destination set in the "Destination on timeout". |
| Icons | Function |
| Add | |
| Delete selected item | |
| Edit | |
| Save selection | |
| Quit without save | |
| Activate function |
Direction options:

| Fieldname | Description |
| Record calls | No function. |
| Direction | Definition of the called direction. Is this an inbound- or an outbound queue. Normally it will be an inbound queue. (inbound means incoming calls). |
Customer options:

| Fieldname | Description |
| Initial | Select the announcement to play for the caller upon entering the queue. |
| Postion announcement interval | Specify the delay or the interval to be used for playing the periodic and position announcement. If an invalid value is entered, the system suggests a valid value. |
| MoH/Ring | Music on Hold. Select whether the customer in a queue should hear the regular “ringing”, the system’s standard hold music or a specific hold music. First, the hold music for the queue has to be uploaded under menu item ELEMENTS/Announcement. |
| Periodic | Periodic announcements are repeated while the caller is waiting. The announcement can also be uploaded to the system under menu item ELEMENTS/Announcement or uploaded by the Add-button. |
| Periodic announcement interval | Specify the delay or the interval to be used for playing the periodic and position announcement. If an invalid value is entered, the system suggests a valid value. |
| MoH (if not ringing) | Music on Hold. When "Custom" is selected under "MoH/Ring" you will be able to select a custom hold music. The hold music for the queue can either be uploaded under menu item ELEMENTS/Announcements or selected by the Add-button symbol. |
You can play the announcement/MoH, if you push the Play-button.
| Icons | Function |
| Add button. | |
| Dropdown. | |
| Play button. |
Member options:

| Fieldname | Description |
| Selection strategy | Select from the following options: All at once, Random, Longest pause first, “Round Robin” successively This is grouped according to Skill Level. |
| Time to wait after timeout | Specify after how many seconds the system should attempt to reconnect the caller to the agent. |
| Report hold time | Select if the members of the queue should be informed about the customers waiting time. |
| Timeout per member | Enter a timeout for the member. I.e., after how many seconds should the call be returned to the queue? |
| Wrap up time per member | Specify how much time a member has to register a completed call before being offered the next call. |
| Member announcement | This allows you to play an announcement to the agent before accepting a call. For example, if a member works several queues, it may be useful to indicate which queue the caller dialed. The queue name is also shown in the telephone display.The announcement can be uploaded by the Add-button. You can also play it by pushing the Play-button. |
| Icons | Function |
| Add. | |
| Dropdown. | |
| | Play. |
Definition Group service
A group is for example a certain number of persons who should be achievable at one (or several) specific telephone number(s). Usually this is used for teams of employees, or departments of a company. In addition, you can configure a pick-up group in the group dialog. The function of a pick-up group is to determine which persons are authorized to put each other on the freely programmable function keys (BLF) on their desk phones (snom, AASTRA) and mutually accept, to monitor and possibly pick up a call from a colleague.
Furthermore, the group dialogue allows you to specify a pick-up group. For example, all members within a pick-up group can answer (pick-up) a call of a co-worker, who is currently unavailable, from their own telephone using a function key (BFL). If a co-worker is not part of a pick-up group, he/she can still add all co-workers to the function keys (BFL) and see when phones are ringing, redirect calls to them or call them with the function key (BFL).The only function, which is not available, is picking up a call**.**
How to edit a Group?
Example:
You want to create a group that is internally accessible at the extension 100. There should be also 2 employees (employee 1 and 2) in this group. If none of the two is available within 60 seconds, the caller will be forwarded to the voicemail of the team leader. Furthermore, this group is the target for the time control 2 (main time).
Instructions:
- Give your group a short name. Then allocate your group the extension number 100, so it is accessible internally. If you have only one trunk line, then a direct dial (external number) is created automatically. If you have multiple trunks, and the group should be accessible for external calls, insert +49 123 456789-100 in the dialog box "Inbound Numbers" to ensure that your extension is also externally accessible at this number.
- Please select finally the members of the group. In this example the extensions are "employee 1" and "employee 2". You also define a timeout of 60 seconds and choose as "Destination if unavailable", the voicemail of the team leader.
Configuration:
In the serviceportal under "Targets" you click on the ADD-button and select a new group service. You can also edit an existing group service by double-click.
A new window with "New group service" with several sections is shown:
| Sections | Pictures |
| Name and extension | |
| Referenced by | |
| Inbound numbers | |
| Members | |
| Customer options |
Standard information for group service.

| Fieldname | Description |
| Display name | Enter a concise name for your group. |
| Extension number (internal number) | Enter the extension number. If no extension number is assigned, the extension cannot be reached internally. |
| Pick-up group | When defining a group as a pick-up group, you define who may answer (pick-up) co-workers’ calls. |
Assignment of DID.

| Fieldname | Description |
| Base number | The direct dial number is automatically assigned according to your extension, once a main outside line has been selected. However, you can also assign multiple direct dial numbers. Simply click on “Add” button and define a new, additional direct dial number. |
| Extension | Assign extension |
Assign a direct dial number
- Push the Add-Button to "Add new Inbound Trunk Number".
- Select "your" dial number and extension.
- Confirm your input by pushing the Confirm-Button.
Change the direct dial number
- Select the entry which should be changed.
- Push the Change-Button.
- Change the direkt dial number or the extension number.
- Confirm your input by pushing the Confirm-Button.
Deleting a direct dial number
- Select the entry you want to delete.
- Push the Delete-Button.
| Icons | Function |
| Add button. | |
| Delete button. | |
| Edit button. | |
| Confirm button, saves changes. | |
| Cancel button. | |
| Close selection. |
Enter the members for this group.

| Fieldname | Description |
| Display name | You have the option of assigning individual members to the group. Simply click the Add-button and select the respective extensions (members).You can also edit (Edit-button) or delete (Delete-button) an existing entry. |
| Icons | Function |
| Add member. | |
| Delete selected member. | |
| Edit. | |
| Confirm. | |
| Cancel. |
Customer options:
| Fieldname | Description |
| Timeout delay (in seconds) | Enter a timeout for the group. I.e., after how many seconds should the caller be rerouted accordingly? |
| Destination on timeout | Here, please select the destination if the group is unavailable. This destination applies if: - all group members are on calls - the timeout was triggered. |
Definition IVR (interactive voice response)
An IVR is initially an announcement. The customer then has several interactive features. For example: For sales inquiries, select the "1", for technical support, please select the "2".
Special case:
Announcement before a personal call: You can also use the IVR for playing a personal announcement before the external caller gets forwarded to the actual extension (employees). For this you select "no option" for each target, and set a timeout with the desired extension as timeout target.
Announcement without recording:
The IVR is also intended to play a personal announcement for incoming calls, which are calling outside normal working hours, but without the option to speak to the company mailbox after the announcement. For this you select "no option" for each goal and set a timeout with the timeout target "hang up".
How to edit an IVR?
Example:
You want to create an IVR, which is externally accessible by calling +49 123 456789 – 111. Furthermore the caller will be connected with the queue “Technical department” if he selects the "1", with the Marketing group if he selects the "2", with the support if he selects the "3" button. The announcement should be repeated if he presses "#" and the call will be terminated if he presses "*". If none of the defined goals is available within 90 seconds, the caller will be forwarded to the voicemail of the team leader.
Instructions:
Enter a short name for your IVR and select an announcement, which you have previously uploaded under the menu item ELEMENTS / Announcement. But you can also upload directly an announcement by clicking the Add-button.
Next you have to allocate the direct dial +49 123 456789-111 to your IVR using the dialog box "Inbound numbers", so that your IVR is accessible for external calls. However, you can also add more direct dials. The number of direct dials per IVR isn’t limited.
Finally select the targets for the IVR:
1: Queue Technical department
2: Group Marketing
3: Support
#: Repeat
*: Hang up
Timeout Delay(in seconds): 90
Destination on Timeout: Voicemail team leader
Configuration
In the serviceportal under "Targets" you click on the ADD-button and select a new IVR service. You can also edit an existing IVR service by double-click.
A new window with "new IVR service" with several sections is shown:
| Sections | Pictures |
| Name and extension | |
| Referenced by | |
| Inbound trunk numbers | |
| Configuration | |
| Key assignments |  |
Standard information for IVR:

| Fieldname | Description |
| Name | Assign a concise name to your IVR. (e.g.: Announcement-hotline). |
| Extension (internal number) | Enter the extension number. If no extension number is assigned, the extension cannot be reached internally. |
Assignment of DID.

| Fieldname | Description |
| Base number | The direct dial number is automatically assigned according to your extension, once a main outside line has been selected. However, you can also assign multiple direct dial numbers. Simply click on “Add” button and define a new, additional direct dial number. |
| Extension | Assign extension |
Assign a direct dial number
1. Push the Add-Button to "Add new Inbound Trunk Number".
2. Select "your" dial number and extension.
3. Confirm your input by pushing the Confirm-Button.
Change the direct dial number
1. Select the entry which should be changed.
2. Push the Change-Button.
3. Change the direkt dial number or the extension number.
4. Confirm your input by pushing the Confirm-Button.
Deleting a direct dial number
1. Select the entry you want to delete.
2. Push the Delete-Button.
| Icons | Function |
| Add button. | |
| Delete button. | |
| Edit button. | |
| Confirm button, saves changes. | |
| Cancel button. | |
| Close selection. |
IVR configuration.

| Fieldname | Description |
| Announcement | Select an announcement to play for the customer when he/she calls. Select the announcements previously uploaded under menu item ELEMENTS/Announcement from the drop-down. The Add-button allows you to upload new announcements. Only use MP3 or WAV files. |
| Icons | Function |
| Add announcement. | |
| Dropdown. | |
| Play. |
Key assingment for IVR:

| Fieldname | Description |
| Maximum numbers of digits | Specify the maximum number of digits, the destinations of IVR are permitted to have. For 2-digit destinations (e.g.:12, 30, etc.) please select "2", etc. |
| Interpret unkown destinations as extension | If this field is activated, undefined destinations of a number sequence (destination=no action) is interpreted as an extension. Example:You select number 120 but no destination (destination=no action). Now if the “Interpret invalid destinations as extension” is ticked, the caller is directly transferred to extension 120 if he/she enters the number sequence “120” during the IVR. |
| Target | Use the Add-button to define destinations for the IVR. Example: |
| Timeout (in seconds) | Specify if the voice dialogue should have a timeout. And if so, what to do when the timeout expires (destination for timeout). |
| Destination on timeout | Target destination on timeout. |
| Icons | Function |
| Add destination | |
| Delete destination | |
| Save selection | |
| Quit without save |
Definition eFax extension
An eFax is a virtual fax. With an eFax you receive conventional faxes in PDF format to your email account.
How to edit a virtual Fax?
Example:
You want to create an eFax that is internally accessible by the extension 111. All incoming faxes will be sent to the email address max@mustermann.net
Instructions:
- Enter a short name for your eFax.
- Next you assign the extension number 111 to your eFax, so that it is internally accessible. If you have only one trunk line, the direct dial (external number) is created automatically. If you have multiple trunks, you need to choose a "Preferred Outbound Trunk" in the "Configuration".
- Afterwards the direct dial (external number) is created automatically.
- Then your eFax is externally accessible at the direct dial +49 123 456789 - 111.
- Finally select your email address "max@mustermann.de" as destination, so the eFax knows where to send incoming faxes.
Configuration
In the serviceportal under "Targets" you click on the ADD-button and select a new eFax service. You can also edit an existing eFax service by double-click.
A new window with "New EFax extension" with several sections is shown:
| Sections | Pictures |
| Name and extension | |
| Referenced by | |
| Inbound numbers | |
| Fax Server Login | |
| Geographical settings | |
| Configuration | |
| Outbound numbers |
Standard information for eFax extensions:

| Fieldname | Description |
| Display name | assign a concise name to your eFax. (e.g.: John Deere eFax). |
| Extension number (internal number) | Enter the extension number. |
Assignment of DID.
| Fieldname | Description |
| Base number | The direct dial number is automatically assigned according to your extension, once a main outside line has been selected. However, you can also assign multiple direct dial numbers. Simply click on “Add” button and define a new, additional direct dial number. |
| Extension | Assign extension |
Assign a direct dial number
1. Push the Add-Button to "Add new Inbound Trunk Number".
2. Select "your" dial number and extension.
3. Confirm your input by pushing the Confirm-Button.
Change the direct dial number
1. Select the entry which should be changed.
2. Push the Change-Button.
3. Change the direkt dial number or the extension number.
4. Confirm your input by pushing the Confirm-Button.
Deleting a direct dial number
1. Select the entry you want to delete.
2. Push the Delete-Button.
| Icons | Function |
| Add button. | |
| Delete button | |
| | Edit button. |
| Confirm button, saves changes. | |
| Cancel button. | |
| Close selection. |
Account information for the Fax Server Login:

| Fieldname | Production |
| Login | Login for your eFax. You need this to install a fax client to send faxes from your computer. |
| PIN | Enter a new PIN for your eFax or keep the generated PIN. |
| Server | Server name for your eFax. You need this to install a fax client to send faxes from your computer. |
Geographical settings:

| Fieldname | Description |
| Language | Here you define the language for your eFax, all settings are set to this language. |
| Dial prefix | Default is the prefix of your site, you can select for this device if the prefix is 0 or 9. It has no influence on the site settings! |
Configuration for eFax:

| Fieldname | Description |
| Specify exactly one email address as the destination, to specify which address eFax should send incoming faxes to. | |
| T30 Fax Identifier | Shows your fax station number that is displayed on in the receiver's fax. |
| Cost center | Specify a cost centre number for the respective extension. This cost centre is listed in the itemised statement. |
| Preferred outbound trunk | Select your preferential outside line for outgoing calls. I.e., which outside line would you like to use to phone “out”. This outside line is then also displayed to the other party. |
| Permission | Here, please specify the direct outward dialling for eFax. I.e., is this extension allowed to send: |
| CLIR | Select whether to show your complete telephone number, only the main number (outside line) or no telephone number at all (block caller ID). |
| Custom tagline | Enter text to be shown in the eFax header. |
| Delete after sent | Define whether the eFax will be deleted after sending or not. |
| nfon News accepted | Accept nfon News. |
Assignment of DID to an eFax.
Here you decide, which DID is shown for outgoing faxes.

| Fieldname | Description |
| Trunk | The direct dial number is automatically assigned according to your extension, once a main outside line has been selected. However, you can also assign multiple direct dial numbers. Simply click on Add-button and define a new, additional direct dial number. |
| Extension | Assign extension |
Assign DID
1. Push the Add-button to "Add new Outbound Trunk Number".
2. Select your DID.
3. Confirm your selection by psuhing the Confirm-button.
Change DID
1. Select the DID you want to edit.
2. Push the Edit-button.
3. Make your changes.
4. Confirm the changes with the Confirm-button.
Delete DID
1. Select the DID you want to delete.
2. Push the Delete-button.
| Icons | Function |
| Add a new base number | |
| Delete selected base number | |
| Edit | |
| Save changes | |
| Exit without changes saved |
The category elements includes all basic components of the telephone system, i.e. the telephones themselves and the audio files to use as hold music, hold music for queues and announcements. Elements are required as components for configuring services and terminals.
After you have signed in, the main navigation window appears.
Here you select either Devices or Announcement.

Devices
A device is usually a phone. However, there are different types of phones:
- standard device (snom desk phone)
- Conference phone (Polycom SoundStation)
- nPhone (Softphone)
- DECT base (Kirk)
- DECT handset (Kirk)
- FMC device
- ATA (Linksys or Patton)
Select your device to suit your needs. If you need a phone for your office, you usually use a standard device. If you travel a lot, you can use your mobile phone as a FMC device. Or if you need a device for your warehouse, you get a DECT wireless handset, so you are always accessible.
First select in the serviceportal ELEMENTS, then select Devices.

In the "Select (List)"-area you see all configured devices. Here you can edit, delete and change an existing device by double-click.
A new device is realised by the Add-button. Here you can select the device and configure it in a new window (e.g. snom821).
If you have bought your device at your provider, then the device is already configured. If you uses own devices, then please follow the next steps.

Description:
| Number | Description |
| 1. | This section show all configured devices, first the icon then the devicename. |
| 2. | This section shows, e.g.Mac-Addresses, IPEI, etc. |
| 3. | This section shows if the device is already allocated to an extension. |
| 4. | When was the device configured. |
| 5. | When was the device deactivated. |
| 6. | Where is the device located, this is important for emergancy situations. |
You can either add a new device or select an existing device. In the List-view you can activate, deactivate, edit or delete a device.
If you push the Add-button, then a new window appears.

Here you select your new device.
| Icons | Function |
| Add icon. | |
| Delete icon. | |
| Edit icon. | |
| Aktivate icon, activate entry. | |
| Deaktivate icon, deactivate entry. |
You can add the next devices:
System phones are all phone devices which where certified on our part. If you order these devices at your provider, then the device is automaticly configured.
All other devices, e.g. nreception, unprovisioned sip, etc., can only be configured by your provider.
| Sections | Picture |
| System phones |  |
| FMC |  |
| DECT Basis |  |
| DECT Handset |  |
| Kirk/Spectralink |  |
System phones:

| Fieldname | Description |
| Firmware | Select the latest firmware for your device. |
| MAC Adresse | MAC address: These are typically on a decal at the bottom of your telephone (or in the telephone menu). The MAC address only needs to be entered in the respective field. |
| Site | Select the location, where you intend on using your device. (This setting is important for emergency calls). |
| webGUI HTTPS only | Allows you to restrict access to the phone's WebGUI to HTTPS. This feature is only available for current firmware versions on snom, Yealink, Polycom, Cicso/Linksys and Spectralink devices. |
| Fieldname | Description |
| External ringtone | Select an external ring tone for your device. |
| Internal Ringtone | Select an internal ring tone for your device. |
| Alarm ringtone | In combination with a DACS (Digital Alarm and Communications Server) |
FMC

Configuration
| Fieldname | Description |
| IMEI/UDID | Enter the IMEI/UDID of your mobile device. |
| Site | You can enter "Site for mobile device", because you don't know where the device is. |
| Reverse Callback |
Geographical settings
FMC Number set
Enter a country specific FMC number set. Save connection charges when using FMC in the selected country, e.g. Call Back functions.

GSM Numbers (+49xxx)
| Fieldname | Description |
| Number | You can assign your GSM-number by pushing the Add-Symbol. |
| Active | Active. |
| Icons | Function |
| Add | |
| Delete selected item | |
| Edit | |
| Save selection | |
| Exit without save |
| Fieldname | Description |
| Firmware | Select the latest firmware for your device. |
| MAC Adresse | MAC address: |
| Site | select the location, where you intend on using your device. (This setting is important for emergency calls). |
DHCP
| Fieldname | Description |
| use DHCP | activate DHCP. |
| IP Address | |
| Netmask | |
| Gateway | |
| DNS1 | |
| DNS2 | |
| MTU |
DECT Handset

Configuration
| Fieldname | Description |
| Base | Select your base station. |
| IPEI | Enter the device number of your handset. |
Kirk / Spectralink Base

Configuration
| Fieldname | Description |
| Firmware | Select the latest firmware for your device. |
| MAC Adresse | MAC address: These are typically on a decal at the bottom of your telephone (or in the telephone menu). The MAC address only needs to be entered in the respective field. |
| Site | Select the location, where you intend on using your device. (This setting is important for emergency calls). |
License key
Optional licenses can be entered under the licence key tab.
The following licenses are possible:
Basis (no license):
- Works without power supply unit or PoE
- Power supply unit is available for an additional charge
- Maximum of 12 users / headsets (as KWS300)
- 6 voice channels (2 more than KWS300)
- Maximum of 3 repeaters (multi cell repeater)
Optional licences (system extension via licences):
- 30 user and 12 voice channels license: use a maximum of 30 users (handsets) though simultanously, the system's voice channels is doubled by 6 (12 in total ).
- Multi Cell license: 3 additional base stations on the system. Up to 6 Repeater (Multi Cell) at full version of a base station.
- Bundle license: combination of the 30 user and 12 voice channels and mutli cell license
- Automatic Alarm Call license: configure automatic alarm calls for the handset alarm sensors (6040 and 7040)
For every licence order there is one license key. In order to assign a valid licence to the Spectralink IP-DECT Server 400, a licence has to be entered for the respective server in the administration portal under Elements / Devices (kirkbase400).
DHCP
| Fieldname | Description |
| use DHCP | activate DHCP. |
| IP Address | |
| Netmask | |
| Gateway | |
| DNS1 | |
| DNS2 | |
| MTU |
| Sections | Pictures | Link |
| Configuration | | |
| Ringtone | | |
| Configuration | | |
| Geograhical settings | | |
| SIP | | |
| Network | | |
| Monitoring | | |
| Codec profile | | |
| uaCSTA | |
Suppressed line number for incoming calls
1. Activate function for trunks
- Go to Administration > Trunks.
- Search for the required K-number.
- Search for the corresponding trunk in the list.
- Set the tick for Always use the preferred outbound trunk.
- Save the setting.
2. Activate function for devices
- Go to Elements > Devices.
- Search for the required K-number.
- Search for the required device in the list.
- Set Configuration > Suppress line number for incoming calls to On.
Configuration für Devices:

| Fieldname | Description |
| Firmware | Select the latest firmware for your device. |
| MAC Adresse | MAC address: These are typically on a decal at the bottom of your telephone (or in the telephone menu). The MAC address only needs to be entered in the respective field. |
| Site | Select the location, where you intend on using your device. (This setting is important for emergency calls). |
| Suppress line number for incoming calls | Function for trunks:
Function for devices:
|
Ringtone for Devices:

| Fieldname | Description |
| External ringtone | Select an external ringtone for your device. |
| Internal ringtone | Select an internal ringtone for your device. |
| Ringtone for group, queue, skill services | Select a ringtone for group, queue, skill services |
For example, to add a DECT handset, a DECT base or an FMC extension, please refer to the respective device manuals for the configuration instructions.
When using used devices, always restore them to factory default before using them.
Configuration for Devices:

| Fieldname | Description |
| use Site configuration | Use site configuration. |
| Icons | Function |
| Activate |
Time zone for Devices:

*Settings "Dial prefix" and "Language" apply when no extension is registered on the telephone.
Example:
The telephone is in UK and is assigned to the location in UK.
Let's say that on this site, the telephone would use the dial prefix 9 and the language English.
Now an extension 355 which defines its language as German and its dial prefix as 9 is registered on the telephone.
Now the extension settings apply on this telephone.
This means, that one the extension 355 is registered on the telephone, it will be used in German with a dial prefix 0 and once there is no registered extension on the telephone, it would be used in English with the dial prefix 9.
| Fieldname | Description |
| Dial prefix* | What dial prefix is the telephone using |
| Language* | Telephone language "Default" means that the standard language of the custumer defined for this site will be used. |
| Public Space | The Public Space feature reduces the function range of the telephone. Such function as conference, transfer, hold, DND, navigation keys, menu, call lists are not available. The Public Space feature is currently available for the following telephone models:
|
| Time zone | Here you can define your time zone. Select the area and the location. |
SIP definitions for Devices

For information and/or changes, please contact your provider.
| Fieldname | Description |
| CANREINVITE | Set by special administrator. |
| NAT | Set by special administrator. |
Network information for Device:

| Fieldname | Description |
| VLAN tagging | |
| Voice VLAN | |
| Data VLAN | |
| Port speed | Input : Auto-Sensing or 100M Full |
| NTP Server |
Monitoring for Devices:

| Fieldname | Description |
| Server | |
| Level | Off, Minimal, Moderate, Detailed. |
| Until | Date |
Codec profile for Devices:

| Fieldname | Description |
| Codec profile | Standard-Codec (G711) or HD-Codec (G722, Fallback=G711). |
uaCSTA definitions for Devices:

| Fieldname | Description |
| Active | Activate the service for the respective device. |
| Server | IP address of the NCTI server |
| Port | Port of the NCTI server |
| Protocol | Used protocol |
| Password | Enter your password. |
You have either assigned the corresponding parameters during the installation of the NCTI server or you have received them from the NFON Support.
Announcement
On the administration portal, please click on the navigation item "ELEMENTS", then "Announcement".

Definition: Announcements are fundamental settings for:
- Queues (“Welcome to Company XYZ…")
- Voice dialogues (“For technical support, please press “1”…”).
The structure of the announcement menu is:
Music:
- Hold music
- Hold music (queue)
Announcements:• General announcements (for example for queue or voice dialogue)Callers always hear the hold music when the call is on hold.On the one hand, there is hold music, which applies to the entire telephone system. You can also assign different hold music to each queue. Personal voice mail announcements are not part of the general announcements. These are configured directly under the extension.
Configuration:
On the administration portal click on the navigation item "Elements/Announcement", in the main window (List) you can add a new announcement by clicking the Add-button, it is also possible to change an existing announcement (double click).

A new window with "New Announcement" with several sections is shown:
| Sections | Pictures |
| New Announcement |  |
Configuration for Announcement

| Fieldname | Description |
| Type | You can select a file for three different types of announcements. - Hold music (skill) |
| Name | Upload an announcement file. Click on the Add-button, this opens a pop-up, allowing you to browse through your drive for an announcement file. In general, only MP3 files or WAV files can be used for all 3 types. To ensure the best audio quality, the file has to be 16 Bit, mono 8000 Hz. |
The use of copyright protected music needs to be authorised by the local representation for music rights such as e.g.:
PRS for Music
GEMA
The maximum file size for announcements is 7 MB.
| Icons | Function |
| Add Announcement | |
| | Play announcement |
All general settings for the portal are done in the "Administration" - area.
The elements are :
- Profile, general information, e.g. email address adminstrator, passwort, call centre, etc.
- Sites, if you have more than one site, you can administrate it.
- Batch Import, import of Phone book entries, extensions, speed dials.
- Phone book, administration of the phone book.
After you have signed in, the main navigation window appears.
Here you select: Profile, Sites, Batch Import or Phonebook.

Profile
On the administration portal click the navigation item "Administration" and then select "Profile".
A new window for "Profile" with several sections is shown:
| Sections | Pictures |
| Customer | |
| Options |  |
| User details | |
| Call recording |  |
| Pilot mode |  |
Customer configuration for Profile

| Fieldname | Description |
| External Identifier | Registration name. |
| Snom Transfer | Transfer characteristics for all snom devices. Information in 5.1.1.1. Snom Transfer. |
| Announcement before conference entry | Aktivates conference announcement. |
snom Transfer
Configuration for Profile:
The snom transfer settings have an influence on the call transfer behaviour between three persons.
| Description | Behaviour snom=0 | Behaviour snom=1 | Behaviour snom=2 |
| 1. Accept incomming call. | Incomming call will be connected with dialed number. | Incomming call will be connected with dialed number. | Connection with callee will be disconnected, first call will be reactivated. |
| 1. First call. | Connection with second call will be disconnected, first call will be reactivated. | First callee will be connected with second callee. | Connection with callee will be disconnected, first call will be reactivated. |
| 1. Get pickup call. | Connection with callee will be disconnected, first call will be reactivated. | First call will be connected with second call. | Connection with callee will be disconnected, first call will be reactivated. |
Options for Profile

| Fieldname | Description |
| Count of trunks | Specify the number of outside lines. Specify whether you wish to use a single digit, double digit or three-digit number of outside lines. The number of outside lines is required e.g., to indicate a different telephone number when placing outside calls. (# + line number + telephone number). |
| Disable external numbers | Disables all extensions from configuring call forwarding to an external telephone number. You can also allow or prohibit call forwarding to external telephone numbers per extension see 3.1.5. Call forward |
| Enable external numbers | Enables all extensions to configure call forwarding to an external telephone number (e.g. mobile phone number). |
| Speed dial length | Specify the speed dial length. For example, by selecting a speed dial length of “2”, you can add 100 speed dials (00-99) to your telephone system, which can then be used by dialling *2+speed dial. Speed dial lists must be added to the phone system as a .csv file. nfon does not provide support for this. |
| SIP transport protocol | Activate or deactivate voice encryption (SRTP). Additional costs incur for the use of SRTP. You can switch between UDP and TCP. |
| Call Center Monitoring | Activate or deactivate call centre monitoring. The use of QueueMetrics is subject to fees. For more information on QueueMetrics, please refer to the „QueueMetrics“ manual on the administration portal. |
| Device creation password | This code is important when adding a softphone. An employee the logs in using the “device password” and not the account password. This ensures no changes are made to the telephone system settings. |
| Webinterface lock | Specify whether the user name and password are required to access employee telephones (web interface). We recommend activating this option as it greatly improves security. |
| Provisioning VLAN | Specify custom VLAN settings for each location. Here you can specify for these VLAN settings to be provided. |
| Options for itemised bill | Specifies whether full or abbreviated telephone numbers will be displayed in your itemised bill. |
| Port lock | Each desk telephone (snom) has a PC port, theoretically allowing you to connect a PC to the Internet using a LAN cable. Here, you can globally block or enable this PC port for the entire telephone system. |
| SIP via TCP | |
| Project number length | For external connections, you can record and charge call expenses according to individuals, customers, projects and private expenses using project codes. The project code is entered before external calls are made. It is also recorded under call data. Enter: *9 + project code + telephone number Therefore, please select the length of the project code here, so it is clearly distinguishable and and can be “separated” for outgoing calls. |
| Intercom enabled | |
| Offline Billing | Calls to special services (e.g. televoting, etc.) are possible. The costs of these calls are billed directly between the external supplier and the customer. To disable the calls, the customer can ask to disable these phone numbers. Please ask your provider. |
| CTI mode | |
| CCBS/CCNR | Activate the CCBS/CCNR function for your entire telephone system. For more information, click here. |

| Fieldname | Description |
| Emergency number | Selected emergency number(s) are displayed here. |
| Add new direct call emergency number | Click on the green button and select emergency numbers from the list. Click on the emergency number and your selection will automatically be added. To save your selection, click on "Save" at the bottom of the page. |
This feature allows you to define emergency numbers.
Once you define emergency numbers, you will no longer need to dial the exit code (e.g. 9 in UK) in front of the emergency number.
Please note the following:
- A number selcted as an emergency number can not be used as an extension number in your telephone system. The feature Direct call of emergency numbers will be activated for the selected number.
Example: You define 999 as an emergency number. 999 can not be used as an extension number.
- In case a number, which you would like to define as an emergency number is already used as an extension number, the extension number needs to be changed.
User details for Profile

| Fieldname | Description |
| Email addresse service portal administrator. | |
| Password | The minimum password length is 12 characters. The password must contain at least Allowed characters are: [a-zA-z0-9!"#$%()*+,-./;<@'_]. Special characters like Ä, Ö, Ü, ä, ö, ü are not allowed anymore! |
| Password again | Repeat the password. |
| Security question | If you forgot the password, you will be able to login by entering a secure answer to your securety question. Enter a new password after this login. |
| Security answer | If you forgot the password, you will be able to login by entering a secure answer to your securety question. Enter a new password after this login. |
Call recording for Profile

With voice recording activated (subject to charges) you will be able to make basic settings here. I.e., after uploading an announcement to be played before voice recordings, select who should hear this recording and the format in which to e-mailing the voice recording after the recording has been ended (WAV or MP3). After the recording is completed, voice recordings are sent to the respective extension which made the recording. It will be sent to the same e-mail address to which VoiceMail messages are sent.You can add an announcement by clicking the Add-button.
| Fieldname | Description |
| Enable call recording | Activate call recording. Liable to pay costs. |
| Use easy mode | |
| Delete messages afterhow many days? | Number of days |
| Audio format | Input: mp3 or wav format |
| Who is going to be informed in case of call recording? | Input: |
| File | Select an announcement, this announcement is played before the call is recorded. E.g. "For security reasons, your call is recorded". |
What is the difference between Pilot Mode and Beta?
Pilot Mode is a self-service opt-in for Cloudya Business Premium customers who want to try out newly developed features before they are ready to be released. In contrast to beta launches, which include very limited support, NFON provides regular support for all pilot features.
How do I activate Pilot Mode?
Pilot Mode is a setting in the admin portal that can be selected at any point in time. There is no additional sign-up or beta agreement required.
- Simply log in to your account on the NFON Portal and activate Pilot Mode under Administration > Profile > Pilot Mode.
- By flipping the switch, all users will have access to the new features in their apps the next time they log in.
- Pilot Mode can also be deactivated at any time. By doing so, users will no longer have access to Pilot Mode features when they login to their apps.
How “final” are the pilot features?
Features in Pilot Mode are meant for daily business. But they are not the final product. They are not part of the service description in any way and therefore there is no guarantee they will be available in the long term. In fact, they are meant to change and improve until they are ready to be deployed as part of a final product. They may never even be part of a final product - depending on our customers’ and partners’ feedback.
Where do I find the documentation?
New features enabled in Pilot Mode are not accompanied by documentation or training. The idea is to unlock these features early and not wait until a manual is written. Providing such documentation in the language of your choice may take longer than making the next change to a feature. Therefore, the features in Pilot Mode come by default without written documentation.
How do I provide feedback?
Feedback regarding features in Pilot Mode can be provided through normal support. Please contact support@nfon.com.
How much does Pilot Mode cost?
There are no charges associated with Pilot Mode. All features can be used by our partners and customers free of charge as long as they are part of Pilot Mode. This does not mean that they will continue to be free of charge when officially released.
Can these features break my system?
No. Features in Pilot Mode are built to not interfere with guaranteed parts of your service. Even if a Pilot Mode feature fails to work, users can carry on as usual with their standard feature set.
What features are currently available in Pilot Mode?
- The first feature available in Pilot Mode was the Meet & Share Video Conference itself, in Spring 2022.
- Between February and May 2023 reactions were available in Pilot Mode when using the Meet & Share Video Conferencing feature.
What is next?
Our next Pilot Mode feature will be Presence for Cloudya. It will enable line status synchronisation between Cloudya and MS Teams – for automated availability status updates between apps and improved productivity. More to come soon!
To synchronise presence (line state) with MS Teams, it is necessary to activate presence synchronisation between Cloudya and MS Teams. It must be done by an admin who has access to the company Microsoft Admin Centre. To do so, it is necessary to create a sync user account and activate MS Teams synchronisation in the Administration portal.
Creating a sync user account in Microsoft tenant
- Create a special sync user in the Microsoft tenant.
- Use the credentials of the sync user to log in the Microsoft account.
- Complete the account setup (e.g., answer questions, confirm user information etc.).
Tip
We recommend naming the user "Presence Sync" and setting the username to "presence-sync@<your-domain-name>.com" to make it easier to identify the account. You don’t need to assign any licences to this user. The account is only used for reading the presence status of all the other users in the company.
Important
Make sure the sync user account is created prior to continuing with the next step.
Activating presence synchronisation from the Administration portal
- Log into the Administration portal.
- Select Profile under Administration.
- In the Customer section, find the MS Teams Presence synchronisation checkbox.
- Tick the box.
⇒You will be redirected to a separate window to perform 3 steps required to complete the synchronisation between Cloudya and MS Teams. - Click the Give admin consent button.
⇒You will be redirected to the Microsoft Admin Center where you will be prompted to enter your administrator email address. - Review the permissions requested.
- Accept the permissions.
- Click on the Log in as sync user button.
- Log in using your sync user credentials.
- Click on the Activate NFON MS Teams Synchronisation button to complete the activation wizard.
Important
Make sure that the email address in the Administration portal, under the voicemail address, is the same as the email address assigned to the MS tenant. Furthermore, the MS Teams username should be assigned to only one extension. If the same email address is assigned to multiple extensions, only one extension, picked randomly, will be synchronised.
Important
Please note that the onboarding process is valid for up to 600 users. It will need to be repeated for every 600 users.
The video below describes how to proceed in detail:
Activating presence integration between Cloudya and MS Teams
Click the navigation item "Administration". Select one of the following items:
- Profile
- Sites
- Batch Import/Export
- Phonebook

Sites
Click on the navigation tab "Administration" and on "Sites.
All sites are listed in the "Sites" section.

A new window with "Sites" is shown:
| Sections | Pictures |
| Site information |  |
| Geographical settings | |
| SIP | |
| Network | |
| Monitoring | |
| Codec profile | |
| uaCSTA |
Site location information in Sites

| Fieldname | Description |
| Street | Enter your street. |
| Area destination code | Enter the area destination code. |
| National destination code | Enter your national destination code. |
| ZIP | Enter your ZIP code. |
| City | Enter the city name. |
| Country | Enter your country. |
| In case of emergency calls take destination from | Enter a destination number for emergency calls. |
| If applicable take outbound number (for emergency calls etc.) from | Enter a number to take outbound calls from. |
Geographical settings for Sites

| Fieldname | Description |
| Dial prefix | Enter your dial prefix. |
| Language | Choose your language. |
| FMC Number Set | Define the FMC number set for this site. Here you can enter a country specific FMC number set. It saves costs, when you use FMC in the selected country, e.g. Call Back functions. |
| Time zone | Here you can define your time zone. Select the area and the location. |
SIP definitions for Sites

For information and/or changes, please contact your provider.
| Fieldname | Description |
| SIP transport protocol | This setting will be inherited from the customer profile. |
| CANREINVITE | Voice traffic /RTP remain within the company network. |
| NAT | Set by special administrator. |
Network information for Sites

| Fieldname | Description |
| VLAN tagging | |
| Voice VLAN | |
| Data VLAN | |
| Port speed | Input : Auto-Sensing or 100M Full |
| NTP Server | |
| Automatic HotDesking | Set automatic Hotdesking for this Site? |
Monitoring for Sites

| Fieldname | Description |
| Server | |
| Level | Off, Minimal, Moderate, Detailed. |
| Until | Date |
Codec profile for Sites

| FIeldname | Description |
| Codec profil | Standard-Codec (G711) or HD-Codec (G722, Fallback=G711). |
uaCSTA definitions for Sites

| Fieldname | Description |
| Active | |
| Server | |
| Port | |
| Protocol | |
| Password |
On the administration portal click the navigation item "Administration" and then select "Batch import".

Batch import
| Fieldname | Description |
| Type to create | Type of import: |
| Replace all existing entries | You have already imported a file and you wish to import a new file of the same type, use this option to specify for all previous entries to be overwritten. When this option is not selected, the existing entries will not be erased and the new file import will insert entries. |
| File | Please click on “Find". Now, you can search your drive for a csv file and select a file. |
Batch export
Example of a phonebook export/import Excel-file:
| Fieldname | Description |
| Type to create | Export-type: - Phonebook |
| Export format | You can choose between two export formats: - .csv (Comma separated values, UTF-8) |

In the administration portal click the navigation item "Administration". Now you can select:
- Profile
- Sites
- Batch Import
- Phonebook
Phonebook
In the administration portal click on the navigation item "Phonebook". On the main window (List) you can add a new phone book entry by clicking the button. It is also possible to change an existing phone book entry (double click).

A new window with "New phone book entry" is shown:
| Sections | Pictures |
| New phone book entry |  |
Configuration for phone book entry

| Fieldname | Description |
| Displayed name | Name for your phone book entry (For example: John Doe). |
| Displayed number | Enter the respective telephone number to your phone book entry. |
| Entry is visibe for (empty list gives visibility to everybody) | Specify whether the phone book entry should be visible to all or only specific extensions. To make the entry only visible to a specific extensions, click on When leaving this list blank, the phone book entry is visible to all extensions. |
| Visible for | List of phone book entry that see your telephone number. |
| Target VPN number | Enter here your O2 VPN number, e.g. 49800588769123*1. |
| VPN Typ | Choose your O2 VPN*1. |
| Icons | Function |
| Add entry | |
| Delete selected entry |
In the event of private use of the telephone system, the employees shall be informed in an appropriate manner about the data processing of private telephone book entries or the individual assignment of favourites / function keys. In various application scenarios, this personal information can be processed within the telephone system use/administration, during technical and operational operation, including troubleshooting or holiday substitution and substitution in case of illness, during the optimisation and during law enforcement scenarios. A distinction between business and private information cannot be made technically, or only to a limited extent.
What is a direct dial number?
The direct dial number corresponds to your external telephone number. That is, this is the number you can be reached at from outside. A direct dial number can refer to either an extension or a service (group, telephone conference, voice dialogue, etc.).
How to configure a direct dial number?
Manual:
Firstly, define the direct dial number that is supposed to serve for external calls for a certain extension or service. Choose a respective trunk line and the corresponding direct dial number.
Secondly, choose the respective target for your direct dial number. This might be an extension or a service. In most cases, the direct dial number is your extension number. It is possible, however to have different numbers for external and internal calls. The latter case applies, for example, for group numbers or telephone conference numbers.
After you have signed in, the main navigation window appears.
After you have selected "DID" a new window appears.
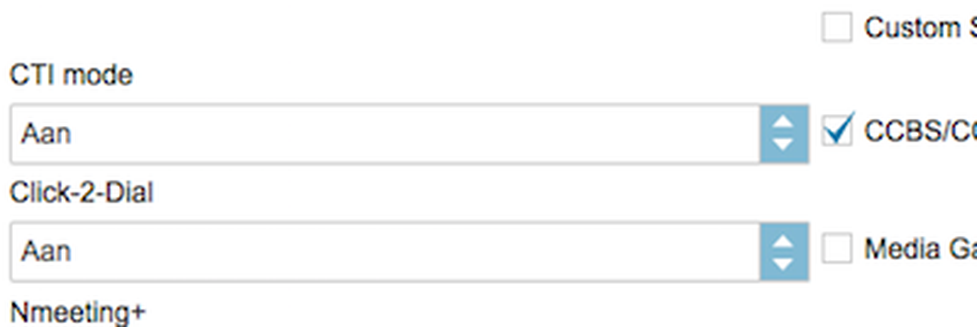
| Sections | Pictures |
| Trunks |  |
| DID | |
Trunks
On the administration portal click the navigation item "DID"
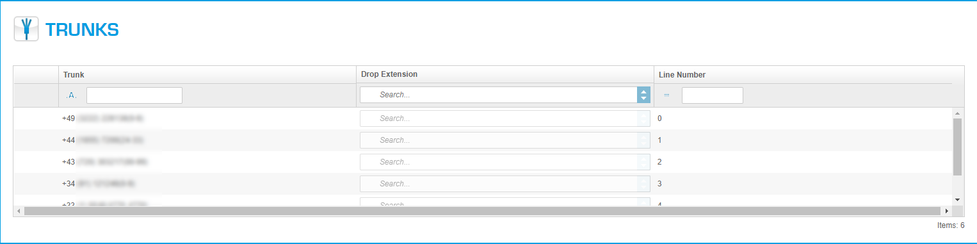
| Fieldname | Description |
| Trunk | Select an outside line for which you would like to add the direct dial number. |
| Drop extension | Select the destination for the "drop extension". If someone calls a number, where there is no extension assigned to, he will be directed to this extension. |
| Trunk number | Define the trunk number for the selected trunk. The trunk number can have 1,2 or 3 -digits. You define this in "Administration/Profil/Configuration (see 5.1.2 Configuration). Every trunk can have only one unique trunk number. Example: If you have assigned a 2 digit number for the trunk number 8, then you have to enter 08, and so on. |
| Icons | Function |
| | Edit entry. |
| Save changes. | |
| | Quit without save. |
DID
On the administration portal click the navigation item DID.
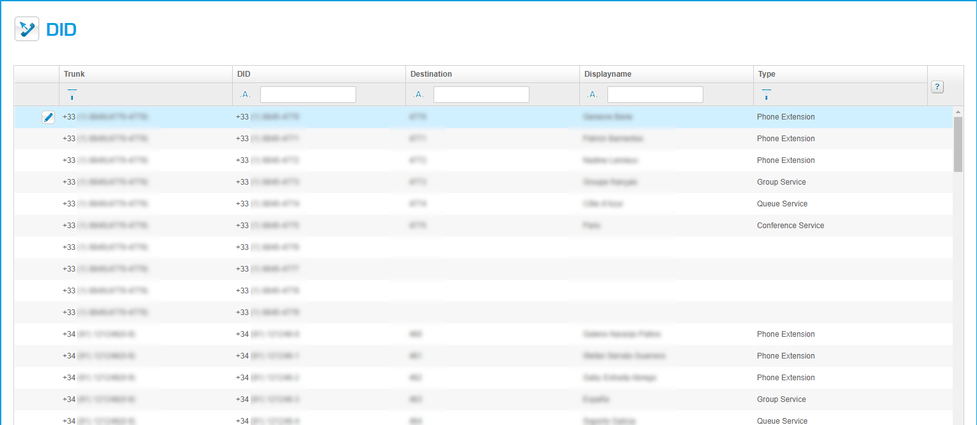
| Fieldname | Description |
| Trunk | Select a trunk to define a name. ( also possible for a function, e.g. mailbox). |
| DID | DID which belongs to this trunk. |
| Destination | The extension number is shown. |
| Display name | Select the name or function which will be assigned to this trunk, DID. |
| Type | Enter sort criteria, sort possibilities for the different functions. |
| Icons | Function |
| Edit. | |
| Save changes. | |
| Quit without save. |
No content available.
You can find online support on the service site for virtually every dialogue.
Simply click on the small question mark ( ) at the top right of the dialogue.
- If you are in the overview dialogue and click on “HELP”, you get general information about the element.
- If you are directly in an element dialogue and click on “HELP”, you get a specific configuration example.

Control codes allow direct access to the telephone system’s functions. The following codes apply:
| Code | Description |
| **## | Restart devices, only for snom devices! |
| #+nnn | Use trunk number "nnn" to call the telephone number ("nnn" replaces the “0” otherwise required to access an outside line). A trunk number can have 1,2 or 3 -digits. You define this in "Administration/Profile/Configuration" (see 5.1.2 Configuration). |
| *1 | Start and end voice recording (if this function is enabled for the extension) |
| *10+profile number | Activation of the call forwarding profile |
| *11+TN | Permanent call forwarding to telephone number (TN) |
| **11 | Cancel permanent call forwarding |
| *12+TN | If not available, forward to telephone number (TN) |
| **12 | Cancel call forwarding if no answer |
| *13+TN | If busy, forward call to telephone number (TN) |
| **13 | Cancel call forwarding if busy |
| *14+TN | If not registered, forward to telephone number (TN) |
| **14 | Cancel forward if unregistered |
| *2+Speed dial | Directly dial the extension/telephone number via speed dial |
| *3 | Pick up the last call ringing in the pick-up groupe |
| *3+EXT | Pick up call coming in to the extension (EXT) |
| *490 | Activate call waiting |
| **490 | Deactivate call waiting |
| *5 | If busy, automatic callback activated |
| **5 | If busy, automatic callback deactivated |
| *55 | Specify primary device within a premium extension (Premium Package) |
| *72+nnnn1 | Call skill service nnnn |
| *73+nnnn1 | Call eFax additional costs will occur |
| *74+nnnn1 | Call time control nnnn |
| *75+nnnn1 | Call group nnnn |
| *76+nnnn1 | Call announcement nnnn |
| *77+nnnn1 | Call queue nnnn |
| *78+nnnn1 | Call conference service nnnn |
| *791 | *791 Access voice mail for this extension with password *791158 Access voice mail for extension 158, with the password for 158! *11*791 Transfer your calls to your voice mail *11*791158 Transfer your calls to the voice mail of the extension 158 |
| *792 | Access voice mail entering extension number, e.g. for remote enquiry |
| *80 | Activate intercom |
| **80 | Deactivate intercom |
| *80+NST | Intercom to extension (EXT) |
| *84+nnnn1 | Become member of the queue with service ID nnnn |
| **84+nnnn1 | Leave queue with service ID nnnn |
| *85 | Echo extension |
| *86 | Block caller ID (CLIR) |
| *860 | Show main number as telephone number |
| *863 | Activate/deactivate Global DND |
| **86 | Show telephone number incl.direct dial (CLIP) |
| *87 | Subscribe to Skill-set |
| **87 | Unsubscribe to Skill-set |
| *9+Project Number | Define a project number for outbound calls. (Note: The project number is only valid for the very next outbound call) |
| Function codes for conference rooms during an active conference. | |
| ** | Help |
| *2 | Activate or deactivate mute. |
| *3 | Express your needs. |
| *5 | Activate or deactivate mute of all participant. |
| *6 | Lock the conference. |
| 1) nnnn is the four digit Service ID with leading zeros (0). For example, in a callgroup, IVR, eFax, etc. This means: is the Service ID "1", "0001" must be entered when entering the function code. |
Main icons
| Icon | Description |
| Targets | |
| Elements / Devices | |
| Elements / Announcements | |
| Administration / Sites | |
| Administration / Batch Import | |
| Administration / Phone book entries | |
| DID / Trunks | |
| DID / DID |
Icons used in Targets
| Icon | Description |
| Phone extension | |
| Conferenz | |
| Time control | |
| Queue | |
| Group | |
| IVR | |
| eFax |
Additional Icons used in the configuration windows for Targets
| Icon | Description |
| No action | |
| Occupied | |
| Hang up | |
| Phone book entry | |
| Voicemail | |
| BFL (Busy filed lamp) | |
| Functionscode | |
| Service e.g. queue / group | |
| Intercom | |
| calender | |
| Forwarding |
Icons used in Elements/Devices
1). Only the support team can create these devices!
| Icons | Description |
| System phone | |
| FMC | |
| DECT | |
| Handset | |
| Softphone | |
| Patton Gateway | |
| Port | |
| nreception1 | |
| Unprovisioned SIP Device1 | |
| Media Gateway1 |
Additional icons used in Elemets/Devices
| Icons | Description |
| Activate device | |
| Deactivate device |
Dialog Icons
| Icon | Function | Icon | Function | Icon | Function |
| ATA | Intercom | Service | |||
| Ring off | Calender | Softphone | |||
| Busy | No action | Speeddial | |||
| Busy Lamp | Customer | IVR | |||
| Efax | Media Gateway | Phone book | |||
| Devices | multiple IVR | Telefon conference | |||
| Filter | DECT | Device | |||
| FMC | Phone extension | Queue | |||
| Function codes | Nreception | Xcapi | |||
| Gateway | Port | Time control | |||
| Group | Number |
Subpage Icons
| Icon | Function | Icon | Function | Icon | Function |
| Trunks | Operator 1 | Sites | |||
| Announcement | Operator 2 | System-Integration | |||
| Batch import | Profile | Phone book | |||
| Devices | Router | Video tutorials | |||
| Tutorials and software | SIP Server | Targets | |||
| Customers | Softswitch |
Filter Icons
| Icon | Description |
| Containing | |
| Start with | |
| Ends with | |
| Equal to | |
| Not equal to | |
| Less than | |
| Less equal | |
| Greather than | |
| Greather equal to |
| Icon | Description |
| Clear all filters | |
| Show/hide colums | |
| Type | |
| Descending order | |
| Ascending order |
Handling icons
1). The changes are only buffert, to save it definitily you have to push the save button.
| Icon | Description |
| Add | |
| Edit | |
| Delete | |
| Quit, no save | |
| Confirm, changes are saved1 | |
| Activate function | |
| Reset input and show selections | |
| Play | |
| Drop-down list | |
| Explanation of the function |
| 1. Level | 2. Level | 3. Level |
| Targets | Phone extension | Name and extension |
| Inbound numbers | ||
| Phone devices | ||
| Voicemail | ||
| Call forward | ||
| Configuration | ||
| Function keys | ||
| Conference service | Name and extension | |
| User options | ||
| Admin options | ||
| Time control service | Name and Extension | |
| Destinations | ||
| Time frame | ||
| Time control exceptions | ||
| Queue service | Name and extension | |
| Members | ||
| Direction options | ||
| Customer options | ||
| Member options | ||
| Group service | Name and extension | |
| Members | ||
| Customer options | ||
| IVR service | Name and extension | |
| Inbound trunk number | ||
| Configuration | ||
| Key assignments | ||
| eFax Extension | Name and extension | |
| Fax Server Login | ||
| Configuration | ||
| Elements | Devices | Configuration |
| Ringtone | ||
| Configuration (part 2) | ||
| Time zone | ||
| SIP | ||
| Network | ||
| Monitoring | ||
| Codec profile | ||
| Media gateway | ||
| uaCSTA | ||
| Announcement | Type | |
| Name | ||
| Play | ||
| Administration | Profile | Customer |
| Options | ||
| User details | ||
| Call recording | ||
| Sites | Site details | |
| Time zone | ||
| SIP | ||
| Network | ||
| Monitoring | ||
| Codec profile | ||
| Media gateway | ||
| uaCSTA | ||
| Batch Import | - | |
| Phonebook | Name and phone number | |
| Entry is visible for | ||
| DID | Trunks | Trunk |
| Drop extension | ||
| Trunk number | ||
| DID | Trunk | |
| DID | ||
| Destination | ||
| Name | ||
| Type |
Wo finde ich die Hauptfunktionen des alten Portals?
| Altes Serviceportal | » | Neues Serviceportal (BETA) |
| ENDPUNKTE | » | Ziele |
| Telefon/Fax | » | Ziele |
| Efax | » | Ziele |
 | ||
| Altes Serviceportal | » | Neues Serviceportal (BETA) |
| DIENSTE | » | Ziele |
| Gruppen | » | Ziele |
| Warteschlangen | » | Ziele |
| Sprachdialoge | » | Ziele |
| mehrstellige Sprachdialoge | » | Ziele (ist in Spachdialoge enthalten). |
| Zeitsteuerungen | » | Ziele |
| Telefonkonferenz | » | Ziele |
 |
| Altes Serviceportal | » | Neues Serviceportal (BETA) |
| ÜBERSICHT | » | Ziele und Durchwahlen |
| Nebenstellen | » | Ziele |
| Durchwahlen | » | Durchwahlen |
 |
INSTALLATION- EXAMPLES
| Question | Example | Date |
| Q1. How do I install a manager / secretary function? | 30.04.2014 | |
Document change history
Description:
Date = Document change date
Chapter changed = Document chapter
History = new function, or update, modifications, ....
Language = in which language the document changes are available (this does not mean that the functionality is not available in this language!).
| Date | Changed chapter | History | Language |
| 14.08.2014 | 4.1.1.2 | New function: FMC number set | DE,EN |
| 5.2.2 | New function: FMC number set | DE,EN | |
| 5.2.4 | New function: Set automatic hotdesking for Site | DE,EN | |
| 28.07.2014 | 7.6. | Insert Document change history | DE,EN,FR,IT |
| 3.1.3. | New function: Abandon other softpones (Hotdesking) | DE | |
| 3.1.6. | Change Dialprefix to Amtsholung (only DE) | DE | |
| 3.1.7. | New function: Customer contact | DE | |
| 3.3.3. | New function: Timezone settings for Time control | DE | |
| 3.8.4. | Wrong description | DE,EN,FR,IT | |
| 4.1.1.1. | New function: List of MAC's and Alarm ringtone for DAKS | DE | |
| 4.1.1.6. | New: Kirk/Spectralink documentation | DE |
September 15th 2016
- Until now, the option "SIP over TCP" could be selected in the customer settings. This function can now only be changed by the NFON support.
- From now on, it is possible to select and activate predefined Directcall Emergency Numbers. With this function, it is no longer necessary to dial the prefix code (e.g. 0 or 9) before dialing the emergency number (e.g. 112). If the activated Directcall Emergency Number conflicts with an existing extension, the Directcall Emergency Number will overrule the extension number. The extension will no longer be available. Vice versa it is not possible to add an extension with the same number as an already activated Directcall Emergency Number. An error message is displayed.
July 28th 2016:
- When adding new devices and changing the inbound trunk number the user used to enter the extension number manually. Now a selection is provided.
- If there is a blank space or a blank line in a CSV import, an error message was displayed. This bug is now fixed.
- The display of lines in a pop-up message during a batch import were cut. The display is now improved.
- Missing translation for Hungarian and Spanish were implemented.
July 14th 2016:
Language improvements for Spanish, general updates and improvements.
June 2nd 2016
From now on it is possible to set distinctive ringtones for groups, skills, and queues.
May 3rd 2016
The update contains mainly smaller improvements.
April 28th 2016
The update contains mainly smaller improvements.
March 31st 2016
The update mainly contains general improvements and bugfixes.
November 5th 2015
The update contains mainly general improvements and small bug fixes.
January 28th 2016
The update contains mainly general improvements and smaller bug fixes.
December 23rd 2015
The update contains mainly smaller bugfixes and improvements.
November 19th 2015
- The bug occurring when adding a Panasonic KX-TGP550 to an extension, was fixed.
- Operators and system integrators have now the possibility to reset customer passwords.
- The minimum and maximum length of passwords and PINS in the customer profile is now also valid for eFax extensions and conference rooms.
- When changing their email address, customers have to enter their current password to accept.
- General bugfixing
- Translation optimization
November 5th 2015
This update contains generall improvements and smaller bugfixes.
October 29th 2015
- Import/Export
- Import: eFax extensions can now be added via the batch import function
- Export: SpeedDial, phone extensions and eFax extensions can now be exported via the batch export function.
- The import and export function supports now .XLS format (Excel 97-2003) besides the already existing .CSV
- Various bugfixes concerning import and export
PIN changes resulting from changed security requirements
- Device creation password, voice mail password und eFax login PIN are no longer displayed as a clear text (except user and admin PINs of conference rooms). The password can still be overwritten with a new password as usual.
- For changes of the customer password entering the current password is necessary
- Individually configurable minimum and maxium Voicemail PIN length for customer settings (4-32)
Internationalization
- New administration portal languages: Spanish, Croatian
- Language improvements: Dutch
- Language selection: Spanish for extensions, eFax extensions, and conference rooms
Other
- Improvement of email validators (support of new domain suffixes)
- Improvement of notifications and error pop ups
August 24th 2015
PIN request for external calls
- It is now possible to activate a PIN request for external calls per extension
June 11th 2015
- Referenced targets, eFax, languages
Referenced targets: A new section has been integrated in the section Targets. It displays all services and extensions that are referenced to the selected service or extension. - Virtual fax: From now on, the tag line of an eFax can be edited. In the past, the default tag line contained the name of the PBX and the extension number. This will stay the default, in case the tag line was not changed manually.
- Languages: Dutch is now available as display language in the administration portal. Furthermore, languages can now be selected via a dropdown menu.
April 23rd 2015
GENERAL SYSTEM IMPROVEMENTS
- This update contains general system improvements for the administration portal.
March 6th 2015
SEVERAL BUG FIXES AND IMPROVEMENTS
- The cancel buttons and save buttons are now displayed in the same order throughout every entry mask.
- When configuring a device in an extension, the device name and type is displayed additionally.
February 2nd 2015
BUG FIXES AND IMPROVEMENTS
- Beta firmware can now be distinguished in the dropdown menu. All beta firmwares are marked as "(BETA)".
- The end device generating password checks minimum requirements for passwords after any changes: The password has to consist of at least 8 characters, at least one capital letter, one lower-case letter, one number and one special character.
- A user can prevent login for Ncontrol on customer- and individually on device-level.
January 22nd 2015
FIXED ERROR MESSAGE WITH NSOFTPHONE PREMIUM DEVICES
- Bugfix: Error message when opening a Nsoftphone premium device leading to the inability to edit the device (e.g. changing the location settings)
January 19th 2015
GENERAL SYSTEM IMPROVEMENTS
- This update contains general system improvements for the administration portal.
December 17th 2014
SEVERAL BUGFIXES
- Bugfix: Customers couldn't edit their profiles because of a bug in the password check
- Bugfix: Wrong message was shown if password does not fit requirements
December 4th 2014
SEVERAL BUGFIXES AND IMPROVEMENTS
- Change name on Login page from "Screen Name" to "Username".
- It is possible to disable the functionality "Click-2-Dial" in Ncontrol for the entire customer and/or an extension. If this function is disabled the user doesn't see it within Ncontrol anymore.
- The language "Dutch" as conference language was removed.
- New Serviceportal language: Polish.
- Several bugfixes.
October 10th 2014
DIVERSE BUGFIXES AND IMPROVEMENTS
- Introduction of Dutch as extension / eFax language within "Geographical settings".
- Assignment of skill-services to function keys among groups, queues etc. possible.
- For the Panasonic KX-TGP500 / 550 there were only 5 ports available in the administration portal to assign handsets to. However the base stations (Panasonic KX-TGP5xx) support 6 ports (Panasonic KX-TPA50). With the update there are now 6 ports available to assign handsets to.
- Unexpected error message at deleting eFax extensions is fixed.
- CTI Option "On", "Off" or "Trial" within Administration/Profile is not editable by customers anymore. Please contact our Sales team or your responsible system integrator for further information.
September 1st 2014
DIVERSE BUGFIXES
- Bugfix: FMC devices cannot be created without GSM numbers anymore
- Bugfix: Unexpected error messages when editing inbound trunk numbers are fixed
- Deleting of deactivated devices with multiselect
- Always set focus to current field when deleting value with "x"
- Error number (timestamp) to exception messages for better identification
- Mediagateway emergency dialplan configuration
- The system password has to contain the following characters according to predefined validation rules: The password has to have at least 8 characters, 1 uppercase, 1 lowercase, 1 special character and one number. Allowed characters are: [a-zA-z0-9!"#$%()*+,-./;<@'_]. Special characters like Ä, Ö, Ü, ä, ö, ü are not allowed anymore!
July, 3rd 2014
TIME ZONE CONFIGURATION FOR TIME CONTROL SERVICES
For time control services it is now possible to define time zones via defining the region (e. g. Europe) and the location (e. g. Berlin).
June 5th 2014
DIVERSE BUGFIXES
- Conference option "Close at exit" works in accordance
- Extension settings "extension name" and "extension number" are not deleted anymore when confirming the inbound trunk numbers
- Defining new outbound trunk numbers for new trunks works in accordance
- Defining the language or the option "Music if single user" are now displayed within the section "Conference options"
May, 19th 2014
DIVERSE BUGFIXES
- Unexpected error when deleting some eFax extensions
- Unexpected error when opening specific service extensions
May, 9th 2014:
DIVERSE BUGFIXES
- The unexpected error message by adding an existing GSM number to a FMC device is fixed
- It's possible to add visible DID numbers to the trunk number
- The unexpected error message "out of service" by clicking through the top menu is fixed
- Among the confirm button for renaming a file during the instant upload function there's also a cancel button available
- A confirmation popup is implemented by deleting one or several targets even though the targets are not referencing to any other targets
- A license field for KIRK bases is implemented
- Validation rules for FMC identifier are implemented
- Checkbox "Show Element Creation" is removed from customer profile dialogue
- It's possible to enter multiple Mac addresses into the "new device" mask
- An additional combobox "Customer contract" is implemented in the extension service
March, 20th 2014:
OPTIMISED IMPORT AND EXPORT HANDLING FOR PHONE BOOK ENTRIES
- "visibleFor" settings does now get updated for existing phone book entries on csv import. Furthermore it's possible to export existing address books entries with a csv file.
March, 5th 2014:
DIVERSE BUGFIXES
The maximum number of digits in an IVR service is now restricted to 10 digits. Furthermore for input fields, you'll find the addition "Search..." to apply the search function. Per click on "X" it is possible to delete existing values in these input fields. Then you're able to choose another value per dropdown function. Moreover the "imprint" in the footer is now internationalized and is therefore linked to the English speaking homepage of NFON. The administration portal offers you besides them another service "New skill service". With that you're able to assign incoming calls to the most suitable agent in call center scenarios. It's possible to configure appropriate skills in the extensions settings.
February, 13th 2014:
DIVERSE BUGFIXES
- Confirming or deleting settings (e. g. during editing inbound numbers) is now possible with Browsers like Google Chrome and Safari. Furthermore it's possible to set an alarm ringtone which is mainly needed for alarm systems. Additionally, a reboot for all devices is triggered as soon as you activate or deactivate SRTP for your telephone system.
February, 6th 2014:
DIVERSE BUGFIXES
- The unexpected error message by deleting a XCAPI device is fixed. Furthermore it is not possible to save devices whose MAC addresses contain special characters (like point, comma, brackets). Moreover it is not possible to assign extensions with the number zero (0).
January, 28th 2014:
DELETING AN EXTENSION WHEN OPENED IN A TAB
- By previously deleting a target which you opened in a seperate tab before, the target itself has been successfully deleted but the tab still has been opened. This resulted in unexpected error messages by the administration portal. Now you are not able to delete a target which is opened in a seperate tab until the opened tab is not closed again.
January, 20th 2014:
DIVERSE BUGFIXES
- The unexpected error message when defining a ring tone for devices is fixed. Furthermore, all icons to delete or edit a target within the list view are aligned by the size and represented in a consistent manner.
January, 15th 2013:
DIVERSE BUGFIXES
- Current settings of your location for ports or handsets will be directly applied by the location of the base. This means, you don't have to define the location for ports or handsets manually anymore in the configuration dialogue. Furthermore the unexpected error message when defining the "dial prefix" in the configuration dialogue for extensions is fixed.
January, 7th 2014:
DIVERSE BUGFIXES
- Configured function keys are now visualised with respective icons in your extension. Furthermore error messages for file imports are optimised. With that you are able to identify mistakes in the CSV file at one glance. These error messages are available in German as well as in English.
December, 18th 2013:
DIVERSE BUGFIXES
- A faulty or unrealistic date for time control exceptions in an IVR service (e. g. 34.12.2013) is now always updated with the most current date (e. g. today). Furthermore, the admin option "Lock until entry" is now active for conference services. Moreover, it's possible to define trunk numbers even without extension. But prerequsite for this option is that the respective trunk number is authorised to do so. Finally, it's possible to rename uploaded .mp3- or .wav-files for queue services in the upload dialogue.
December, 11th 2013:
PLAY MESSAGES FOR QUEUE SERVICE
- Up to now it wasn't possible to play initial or periodic announcements for queue services after uploading them. This is now fixed within the new service portal. Deleting announcements is possible via Elements/Announcements.
Where can you get help?
You can use various sources for help concerning your issues. Please use them in the order suggested here:
On voip-centrex.dfn.de you will find an overview of all documentation, downloads and portals as well as help pages and further information. | |||||||||
The home page of the service site contains various links to manuals, brief instructions, software downloads and templates. Please read these manuals thoroughly. They help you get the most out of your telephone system. | |||||||||
Support hotline for existing customers | Incident report for DFN customers:
| ||||||||
| Important informationen for the Service Desk
| ||||||||
Support hotline for test customers | As a test customer, the detailed information is avaialable under https://voip-centrex.dfn.de/index.php?id=26621. |