Jump to:
No content available.
Welcome!
This manual helps you to optimize the usage of the IP telephone in combination with the PBX. Please use this manual at initial operation. Some features differ from the features described in the manufacturer's documentation.
The following pages describe the Polycom VVX models.
 |  |  |
| VVX101 | VVX201 | VVX311 |
 |  |  |
| VVX411 | VVX501 | VVX601 |
 | ||
| Expansion module (max. 3) available for VVX 300-600 |
We hope you enjoy using the telephones!
| Type | Icon/Character | Description |
| NOTE
CAUTION
WARNING | NOTE: Information that is useful but not critical to the reader.
CAUTION: Tells the reader to proceed with caution.
WARNING: Stronger than CAUTION; means "don't do this" or that this step could be irreversible, e.g., result in permanent data loss. | |
| TIP |
| Useful tips that provide additional information. |
| Procedure | 1. 2. 3. | Procedures are numbered steps to perform an action, where the order of the steps is relevant. |
| Result of procedure/action | ⇒ | Indicates the result of an action//procedure. |
| Lists | • • | Used for listings and items where the order of steps is irrelevant. |
No content available.
Please note that the video functionality is not supported.
Please note that uaCSTA (CTI) is available from formware 6.0.0.
The device was produced in accordance with the most common security standards. Nevertheless, note the safety guidelines in order to use the device securely. Please note the following safety guidelines to lower risk of burning, electric shocks, and similar risks.
General guidelines
1. Keep the device dry and clean at transport, storage, and usage.
2. Avoid collisions and drops of the device at transport, storage, and usage.
3. Do not open the device case and do not try to repair the device on your own.
Guidelines for usage and operation
1. Check whether the power supply voltage is in accordance with the device's voltage.
2. Pay attention to dry hands before using a cable.
3. Do not spill liquids on the device.
Guidelines for cleaning
1. Disconnect and unplug the device from the power supply before cleaning.
2. Use a soft, dry, antistatic cloth to clean the device.
Please find instructions on operation in the manufacturer's manual.
You have the option of voice encrypting (SRTP) your telephone calls. You can activate this function for your customer account via the administration portal at any time.
Activation of this function is subject to fees.

- Activate the function on the administration portal.
- Restart all telephones. Restarting may take a few minutes. During a conversation a lock icon on the telephone display indicates encryption is activated.
⇒ The active call is now encrypted.
You can activate the function Voice Traffic encryption (SRTP) on the administration portal under ADMINISTRATION / Profile.
No content available.
In order to use this IP telephone with your telephone system you will need a sound broadband connection.
If you only have a single circuit plug available (e. g. in home offices) but would like to access the Internet with your laptop while using the phone, connect the laptop to the circuit plug on the phone.
This feature is not available on Polycom VVX 101 models.
All telephones you receive are preconfigured and connected to the telephone system.
Find further information on how to install an extension in the administration portal manual.
No content available.
No content available.
Below you will see an overview over all keys of the respective models.
Polycom VVX 101 / 201

Polycom VVX 311 / 411
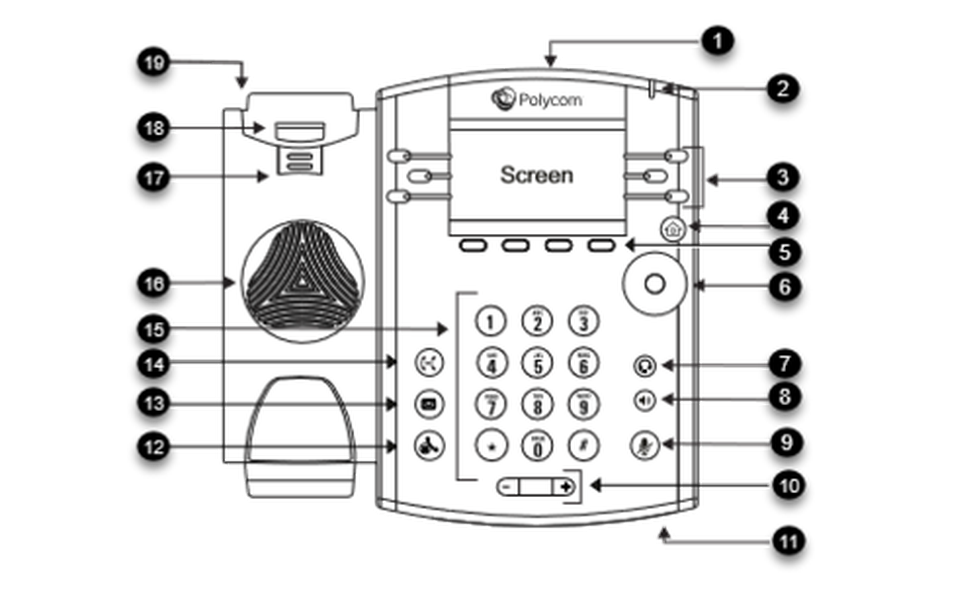
| Pos. | Description |
| 1 | USB port |
| 2 | Message Waiting Indicator |
| 3 | Line keys |
| 4 | Home key |
| 5 | Soft key |
| 6 | Navigation keys/ select key |
| 7 | Headset key |
| 8 | Speakerphone key |
| 9 | Speakerphone key |
| 10 | Volume key |
| 11 | Microphone |
| 12 | Hold |
| 13 | Message |
| 14 | Transfer |
| 15 | Dialpad |
| 16 | Speaker |
| 17 | Reversible tab (for wallmount installation) |
| 18 | Hookswitch |
| 19 | Security slot |
Polycom VVX 501 / 601
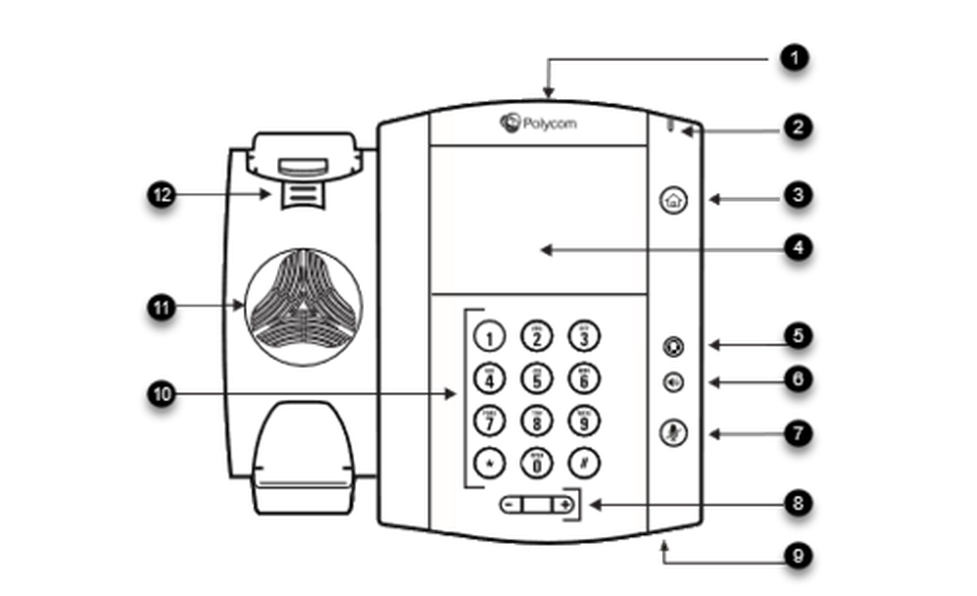
| Pos. | Description |
| 1 | USB port |
| 2 | Message Waiting Indicator |
| 3 | Home/line key |
| 4 | Home/line key |
| 5 | Headset key |
| 6 | Speakerphone key |
| 7 | Mute key |
| 8 | Volume keys |
| 9 | Microphone |
| 10 | Dialpad |
| 11 | Speaker |
| 12 | Reversible tab |
| Key | Description |
 | You can use the navigation keys to steer through the menu. On the initial page:
|
| Adjusts the speaker's and telephone's volume | |
| Mutes the microphone | |
| Headset | |
| Speaker | |
| Transfer* | |
| Hold conversation* | |
| * not available for Polycom VVX 501 & 601 |
Entering the extension number is sufficient when performing an internal call. If you choose to perform an external call, you have dial the exchange identification code (e.g. "9" for UK) prior to the external number.
You have the following options to perform an outgoing call:
Receiver
- Pick up the receiver.
- Enter the telephone number.
- Confirm your call by pressing the Send soft key.
- End the conversation by pressing the soft key End Call or hanging up.
Alternative:
- Enter the telephone number.
- Pick up the receiver.
- End the conversation by pressing the End Call soft key or hanging up.
Speaker
- Press the speaker key to activate the speaker.
- Dial the telephone number.
- Confirm your call by pressing the Send soft key.
- End the conversation by pressing the soft key End Call.
Headset
- Activate the headset by pressing the headset key  .
.
- Dial the telephone number.
- Confirm your call by pressing the Send soft key.
- End the conversation by pressing the soft key End Call.
To answer an incoming call, you have the following options:
- Pick up the receiver or press the speaker key  to answer an incoming call. Press the headset key in order to answer with your headset.
- End the conversation by hanging up or by pressing the End Call soft key.
Call Waiting
The display of the telephone sends out a double knocking sound as soon as a second call comes in during an active conversation.
You have the following options:
- You can take the incoming call by pressing the Answer soft key and set the active conversation on hold.
- You can reject the incoming call by pressing the soft key Reject.
- You can transfer the incoming call without taking it directly. Press the Transfer soft key or the transfer key ![]() *.
*.
Incoming calls can only knock, if the the Call waiting indication (CWI) for the extension is activated. To enable CWI for your phone, select Call Waiting Indication in the menu under Call Settings.
Hold a Call
- In order to hold an active call, press the Hold key or push the Hold button *.
*.
- To take an incoming call during an active conversation, press the Answer soft key. To reject an incoming call, press the Reject soft key. You can transfer incoming calls directly by pressing the transfer button ![]() * or the Transfer soft key.
* or the Transfer soft key.
⇒ The active conversation is now on hold.
Currently, it is not possible to access the central directory during a call on hold.
Toggle
- To toggle between two callers, press the soft key Swap. You can further toggle between the conversations using the navigation keys and confirm your choice by pressing the Resume soft key.
⇒ The active conversation is put on hold and the caller hears a waiting music.
To transfer an incoming call, you have the following options:
Attended Transfer
- After taking the call, press the Transfer soft key.
- Now enter the extension number.
- Press Transfer.
- Announce the incoming call.
- To transfer the call, press the Transfer soft key, then you can hang up.
Unattended transfer
- Press the Transfer soft key during an active call.
- Enter the destination extension number and press the Transfer key.
- Hang up.
If you want to perform a transfer during an active conversation follow the next steps:
Answer the call by pressing the Answer soft key.
Press the Transfer soft key.
Choose the line you want to transfer to.
Confirm with the Transfer soft key for an unattended transfer.
Blind Transfer
- Do not take the incoming call.
- Press the soft key Transfer.
- Enter the number.
- Press the Transfer soft key.
- Hang up to finalise the transfer.
- When transferring a call that is on hold, you have the option to perform an unattended transfer by pressing the soft key Transfer, entering the number and press Transfer again.
Call forwarding
You can configure various call forwarding scenarios. For this purpose you can use the call forwarding profiles.
Under the telephone menu you can only edit the default profle (catch all / always) to be found under the call forwarding profiles. You can edit the remaining call forwarding profiles via Ncontrol or via the administration portal. For more information, refer to the administration portal manual and the Ncontrol manual.
The following call forwarding options are available. You can activate or deactivate call forwardings via the telephone menu's call settings.
Permanent call forwarding (always)
All incoming calls will be forwarded directly to the predefined telephone number.
Forward if busy (busy)
New calls will be forwarded immediately, when coming in during an active call. This call forwarding option functions only, if the Call Waiting function is deactivated.
Delayed call forwarding (no answer)
Call forwarding condition: You do not answer the incoming call within a defined time period (timeout). The timeout can be set to 5, 10, 15 or 20 seconds. Where should the incoming call be forwarded after the specified time has elapsed? The caller receives a call waiting signal and is then forwarded to the defined destination.
If unavailable (not registered)
The option functions only if the end device is not registered to the telephone system:
- When the Internet connection fails or there is no LAN connection.
and
- If “call forwarding …if unavailable” is programmed for a direct extension (e.g. extension 123 - John Doe) and a caller calls the direct dial number for the extension directly, call forwarding applies. If the extension is a member of a queue or a group and the queue or group receives a call, call forwarding for the individual extension no longer applies! In general, the destination should always be an available destination number. I.e., make sure that no voicemail or announcement comes on.
Always depose
Always depose an available telephone number as target. Ensure that no voice mail or other announcement picks up automatically.
When disconnecting
When disconnecting the connection between the end device and the telephone system, it can take up to 60 seconds for the call forwarding to work. Once the end device is reconnected to the telephone system, it can take up to 60 seconds for it to register.
Call forwarding codes
Call forwardings can alternatively be activated through * codes:
| *10 | Activation of the call forwarding profile |
| *11 + destination | Permanent call forwarding to telephone number |
| **11 | Cancel permanent call forwarding |
| *12 + destination | If no answer after a specific time, delayed call forward to telephone number |
| **12 | Cancel delayed call forwarding |
| *13 + destination | If busy, forward to telephone number |
| **13 | Cancel call forwarding if busy |
| *14 + destination | Call forwarding if unavailable |
| **14 | Cancel call forwarding if unavailable |
Follow these steps to start a conference call:
- Call the first participant.
- Press the Conference soft key.
- Dial the second participant's number.
- Press the soft key Send.
- As soon as the second party answers the call, press the Conference soft key once again to start the conversation with both participants.
You can split ongoing conferences to seperate calls with the soft key Split. Pressing the soft key Manage allows you to mute or remove participants.
A conference call with more than three participants is easily established via the administration portal: Please refer to the administration portal manual for more information.
Mit der Funktion Do Not Disturb (DND) können eingehende Anrufe automatisch abgewiesen werden. (Eingehende Anrufe werden als „verpasste Anrufe“ angezeigt).
Aktivieren Sie den DND-Modus wie folgt:
- Drücken Sie die DND (Nicht-Stören)-Soft-Taste auf Ihrem Display.
Ihr Telefon ist im DND-Modus, wenn auf dem Display das Zeichen  angezeigt wird. Ist Ihr Endgerät im DND-Modus, wird der Anrufer standardmäßig SOFORT auf das Ziel der Weiterleitung "Nach Zeit" weitergeleitet.
The Completion of Calls on No Reply (CCNR) creates a callback in case a person cannot be reached (e.g. the person is not on its desk or busy) at the moment.
To use this function, the CCNR function has to be enabled in the administration portal and in the phone extension. Click on the CCNR check box under Administration / Profile to activate the function.
Activate a callback
A caller generates automatic connection establishment within the private branch exchange (PBX) to a previously busy party (only internally). If the the other party cannot be reached, the caller can use the callback function.
- In order to activate the function, insert *5 into your key pad. An acoustic confirmation will finalize the activation.
- As soon as the other party is available again, your end device receives a callback generated by the PBX. As soon as you answer the callback, the PBX sends out a call to the number you tried to reach initially.
Erase Callbacks
- If the callback is no longer needed, all call backs can be erased by entering the **5 code into the key pad. An acoustic confirmation finalises the erase.
Initial Set-up
When accessing the voice mail system for the first time, set up your personal voice mail.
- Press the message key on the telephone or dial the extension assigned by the administration portal to access the voice mail menu.
- Then select “0 Mailbox Options” to set up your voice mail box.
- Now press “1” to record a message in the event you are unavailable.
- Now record your message and press “#” to end the recording.
- Press “1” to accept the recording, “2” to replay the recording, and “3” to record a second time.
.
Access the voice mail
- Press the Message key  or dial *791 to access the voice mail.
- Enter your extension you saved in the administration portal and your voice mail pin to access the voice mail options.
You can install your personal voice mail announcement for every extension via the administration portal. These files have to be in .mp3 or .wav format.
Send voice mail messages to your email account via the administration portal.
For more detailed information, refer to the voicemail leaflet.
Die Basisfunktionalität des „Hot Desking“ ermöglicht das Abmelden existierender und das Anmelden neuer Nutzer auf Ihrem Endgerät. Die ist hilfreich, wenn Mitarbeiter oft Ihren Arbeitsplatz wechseln ohne ihre Endgeräte mitzunehmen. Ihre Konfiguration wird automatisch nach dem erfolgreichen Anmelden auf das neue Telefon übertragen.
1. Schritt: Abmeldung der momentanen Nebenstelle
Menü -> Telefoneinstellungen -> Nebenstelle abmelden -> Ja
2. Schritt: Anmeldung der neuen Nebenstell
Menü -> Eingabe der Nebenstellen-Nummer -> Senden -> Eingabe der Voicemail PIN als Passwort -> Senden -> OK
Die An- und Abmeldung der Nebenstelle kann ggf. einige Zeit in Anspruch nehmen.
No content available.
You can use various features of the telephone system via the end device as well as via Ncontrol or the administration portal (also refer to the administration portal manual).
After pressing the Menu key you have the following options:
Call settings
- Call waiting indication: define whether this function should be activated.
- (optional, depending on settings on the administration portal) Timeout: set the ringing time.
- (optional, depending on settings on the administration portal) Intercom: the intercom function enables speaking directly to a linked extension through the system, without dial tone and ring tone.
- Caller ID block: set your entire number to be shown to the party being called, the switchboard number to be displayed or all caller ID information to be blocked.
- Call forwarding: activate the function Call forwarding
- Parallel call: configure another telephone or your mobile phone to ring in addition to your telephone when a call comes in. You can then answer the call with one of the two telephones.
Call forwarding: profiles
Here you can select your preconfigured call forwarding profiles.
For details, please refer to the Ncontrol manual.
You can edit the default profile directly via your device.
For details, please click here.
Telephone settings
- Automatic redialling
- Suggests number (if necessary, remove function)
- Ring tone
- Define as primary device
- Logoff
Queues
Queues can be enabled or disabled; for set-up see administration portal manual)
Navigation
Use the navigation keys to mark the desired selection and press .
Die Programmierung der frei belegbaren Funktionstasten können Sie auf ncontrol.nfon.net unter dem Punkt Einstellungen - Funktionstasten vornehmen. Diese können auch über das Serviceportal geändert werden. Längere Namen werden auf dem Display in verkürzter Form dargestellt.
| Hardware type | Number of function keys |
| Polycom VVX 100 – 200 Serie | 1 |
| Polycom VVX 300 Serie | 5 |
| Polycom VVX 300 Serie | 7 |
| Polycom VVX 400 and VVX 600 Serie | 11 |
| Polycom VVX Tastaturerweiterung | 28 Funktionstasten |
Extension / telephone number
You can add any extension or telephone number to the busy lamp field.
- You can start a call by pressing the respective busy lamp key. If an internal extension is programmed, you can see whether that extension is currently busy:
- If the LED next to the key flashes, the party receives a call.
- If the LED is consistently lit, the party has answered a call and is currently busy.
- If the LED next to the respective key flashes, you can take the call by pressing the respective key next to the flashing LED.
Intercom
You can add any extension in the PBX system and then use this function key to directly communicate with this extension through the intercom. The other party must have the intercom activated on their device. Intercom refers to a conventional intercom system (similar to walkie-talkies) directly connecting you to the other party’s speaker by pressing the assigned function key.
Function codes
Control codes allow direct access to the telephone system’s functions. The following codes apply:
| Code | Description |
| **## | Restart devices, only for snom devices! |
| #+n | Use outside line "n" to call the telephone number ("n" replaces the “0” otherwise required to access an outside line) |
| *1 | Start and end voice recording (if this function is enabled for the extension) |
| *10+profile number | Activation of the call forwarding profile |
| *11+TN | Permanent call forwarding to telephone number (TN) |
| **11 | Cancel permanent call forwarding |
| *12+TN | If not available, forward to telephone number (TN) |
| **12 | Cancel call forwarding if no answer |
| *13+TN | If busy, forward call to telephone number (TN) |
| **13 | Cancel call forwarding if busy |
| *14+TN | If not registered, forward to telephone number (TN) |
| **14 | Cancel forward if unregistered |
| *2+Speed dial | Directly dial the extension/telephone number via speed dial |
| *3 | Pick up the last call ringing in the pick-up groupe |
| *3+EXT | Pick up call coming in to the extension (EXT) |
| *490 | Activate call waiting |
| **490 | Deactivate call waiting |
| *5 | If busy, automatic callback activated |
| **5 | If busy, automatic callback deactivated |
| *55 | Specify primary device within a premium extension (Premium Package) |
| *72+nnnn1 | Call skill service nnnn |
| *73+nnnn1 | Call eFax additional costs will occur |
| *74+nnnn1 | Call time control nnnn |
| *75+nnnn1 | Call group nnnn |
| *76+nnnn1 | Call announcement nnnn |
| *77+nnnn1 | Call queue nnnn |
| *78+nnnn1 | Call conference service nnnn |
| *791 | *791 - Access voice mail for this extension with password *791158 - Access voice mail for extension 158, with the password for 158! *11*791 - Transfer your calls to your voice mail *11*791158 - Transfer your calls to the voice mail of the extension 158 |
| *792 | Access voice mail entering extension number, e.g. for remote enquiry |
| *80 | Activate intercom |
| **80 | Deactivate intercom |
| *80+EXT | Intercom to extension (EXT) |
| *84+nnnn1 | Become member of the queue with service ID nnnn |
| **84+nnnn1 | Leave queue with service ID nnnn |
| *85 | Echo extension |
| *86 | Block caller ID (CLIR) |
| *860 | Show main number as telephone number |
| **86 | Show telephone number incl.direct dial (CLIP) |
| *87 | Subscribe to Skill-set |
| **87 | Unsubscribe to Skill-set |
| *9+Project Number | Define a project number for outbound calls. (Note: The project number is only valid for the very next outbound call) |
| Function codes for conference rooms during an active conference. | |
| ** | Help |
| *2 | Activate or deactivate mute |
| *3 | Express your needs |
| *5 | Activate or deactivate mute of all participant |
| *6 |
|
| 1) nnnn is the four digit Service ID with leading zeros (0). For example, in a callgroup, IVR, eFax, etc. This means: is the Service ID "1", "0001" must be entered when entering the function code. |
No content available.
You need your phone's IP address for example for configuration of the CTI client.
- Press the home button  , then go to settings -> 4 status -> 2 network -> 1 TCP/IP parameter.
Where can you get help?
You can use various sources for help concerning your issues. Please use them in the order suggested here:
On voip-centrex.dfn.de you will find an overview of all documentation, downloads and portals as well as help pages and further information. | |||||||||
The home page of the service site contains various links to manuals, brief instructions, software downloads and templates. Please read these manuals thoroughly. They help you get the most out of your telephone system. | |||||||||
Support hotline for existing customers | Incident report for DFN customers:
| ||||||||
| Important informationen for the Service Desk
| ||||||||
Support hotline for test customers | As a test customer, the detailed information is avaialable under https://voip-centrex.dfn.de/index.php?id=26621. |
No content available.